Partek Flow is a genomics data analysis and visualization software product designed to run on compute clusters. The following instructions assume the most basic setup of Partek Flow and must only be attempted by system administrators who are familiar with Linux-based commands. These instructions are not intended to be comprehensive. Cluster environments are largely variable, thus there are no 'one size fits all' instructions. The installation procedure on a computer cluster is highly dependent on the type of computer cluster and the environment it is located. We can to support a large array of Linux distributions and configurations. In all cases, Partek Technical Support will be available to assist with cluster installation and maintenance to ensure compatibility with any cluster environment. Please consult with Partek Licensing Support (licensing@partek.com) for additional information.
Prior to installation, make sure you have the license key related to the host-ID of the compute cluster the software will be installed in. Contact licensing@partek.com for key generation.
Installation on a Computer Cluster
Make a standard linux user account that will run the Partek Flow server and all associated processes. It is assumed this account is synced between the cluster head node and all compute nodes. For this guide, we name the account flow
Log into the flow account and proceed to the cd to the flow home directory
cd home/flow
Download Partek Flow and the remote worker package
wget --content-disposition http://packages.partek.com/linux/flow
wget --content-disposition http://packages.partek.com/linux/flow-workerUnzip these files into the flow home directory /home/flow. This yields two directories: partek_flow and PartekFlowRemoteWorker
Partek Flow can generate large amounts of data, so it needs to be configured to the bulk of this data in the largest shared data store available. For this guide we assume that the directory is located at /shared. Adjust this path accordingly.
- It is required that the Partek Flow server (which is running on the head node) and remote workers (which is running on the compute nodes) see identical file system paths for any directory Partek Flow has read or write access to. Thus /shared and /home/flow must be mounted on the Flow server and all compute nodes. Create the directory /shared/FlowData and allow the flow linux account write access to it
- It is assumed the head node is attached to at least two separate networks: (1) a public network that allows users to log in to the head node and (2) a private backend network that is used for communication between compute nodes and the head node. Clients connect to the Flow web server on port 8080 so adjust the firewall to allow inbound connections to 8080 over the public network of the head node. Partek Flow will connect to remote workers over your private network on port 2552 and 8443, so make sure those ports are open to the private network on the flow server and workers.
- Partek Flow needs to be informed of what private network to use for communication between the server and workers. It is possible that there are several private networks available (gigabit, infiniband, etc.) so select one to use. We recommend using the fastest network available. For this guide, let's assume that private network is 10.1.0.0/16. Locate the headnode hostname that resolves to an address on the 10.1.0.0/16 network. This must resolve to the same address on all compute nodes.
- For example:
host head-node.local
yields
10.1.1.200
Open /home/flow/.bashrc and add this as the last line:
export CATALINA_OPTS="$CATALINA_OPTS -Djava.awt.headless=true
-DflowDispatcher.flow.command.hostname=head-node.local
-DflowDispatcher.akka.remote.netty.tcp.hostname=head-node.local"
Source .bashrc so the environment variable CATALINA_OPTS is accessible.
NOTE: If workers are unable to connect (below), then replace all hostnames with their respective IPs. - Start Partek Flow
~/partek_flow/start_flow.sh - You can monitor progress by tailing the log file partek_flow/logs/catalina.out. After a few minutes, the server should be up.
- Make sure the correct ports are bound
netstat -tulpn You should see 10.1.1.200:2552 and :::8080 as LISTENing. Inspect catalina.out for additional error messages.
Open a browser and go to http://localhost:8080 on the head node to configure the Partek Flow server.
Enter the license key provided (Figure 1)
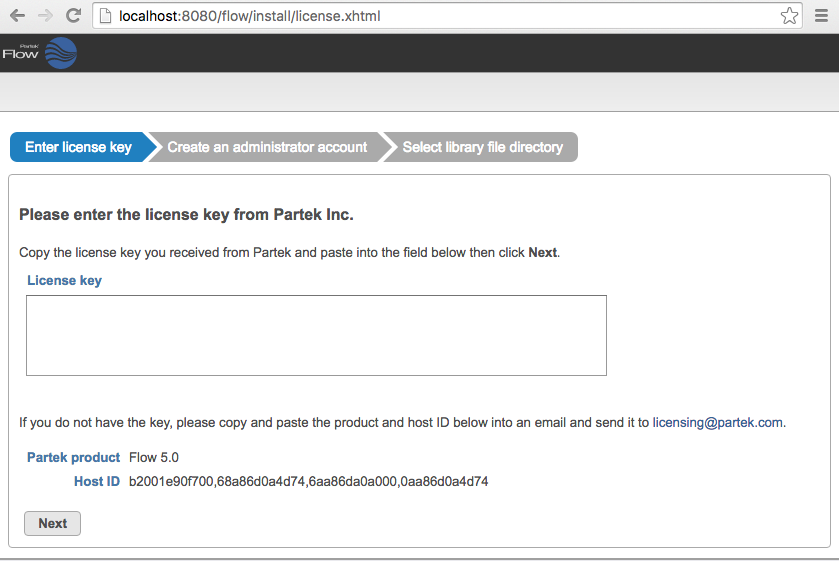 Figure 1. Setting up the Partek Flow license during installation
- If there appears to be an issue with the license or there is a message about 'no workers attached', then restart Partek Flow. It may take 30 sec for the process to shut down. Make sure the process is terminated before starting the server back up.:
~/partek_flow/stop_flow.sh
Then run:
~/partek_flow/start_flow.sh You will now be prompted to setup the Partek Flow admin user (Figure 2). Specify the username (admin), password and email address for the administrator account and click Next
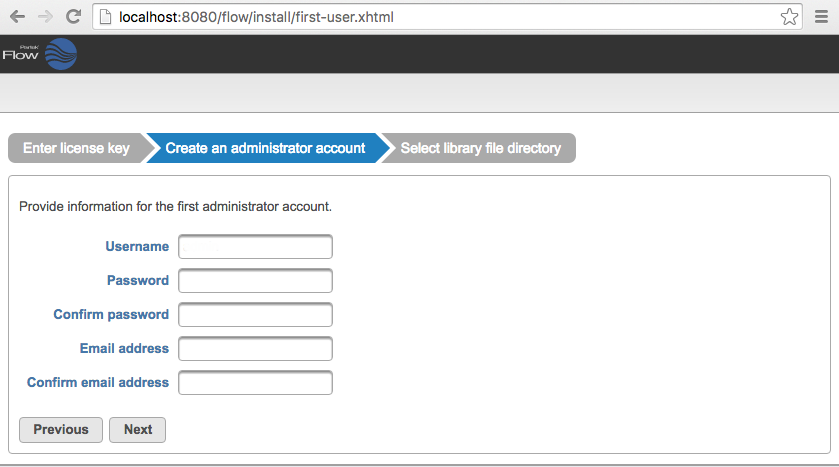 Figure 2. Setting up the Partek Flow 'admin' account during installation
Select a directory folder to store the library files that will be downloaded or generated by Partek Flow (Figure 3). All Partek Flow users share library files and the size of the library folder can grow significantly. We recommend at least 100GB of free space should be allocated for library files. The free space in the selected library file directory is shown. Click Next to proceed. You can change this directory after installation by changing system preferences. For more information, see Library file management.
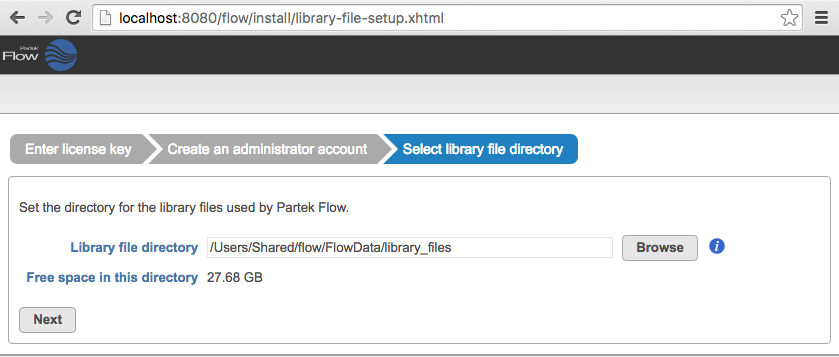 Figure 3. Selecting the library file directory
- To set up the Partek Flow data paths, click on Settings located on the top-right of the Flow server webpage. On the left, click on Directory permissions then Permit access to a new directory. Add /shared/PartekFlow and allow all users access.
- Next click on System preferences on the left menu and change data download directory and default project output directory to /shared/PartekFlow/downloads and /shared/PartekFlow/project_output respectively
Note: If you do not see the /sharedfolder listed, click on the Refresh folder list link that is toward the bottom of the download directory dialog - Since you do not want to run any work on the head node, go to Settings>System preferences>Task queue and job processing and uncheck Start internal worker at Partek Flow server startup.
- Restart the Flow server:
~/partek_flow/stop_flow.sh
After 30 seconds, run:
~/partek_flow/start_flow.sh
This is needed to disable the internal worker. - Test that remote workers can connect to the Flow server
- Log in as the flow user to one of your compute nodes. Assume the hostname is compute-0. Since your home directory is exported to all compute nodes, you should be able to go to /home/flow/PartekFlowRemoteWorker/
- To start the remote worker:
./partekFlowRemoteWorker.sh head-node.local compute-0 - These two addresses should both be in the 10.1.0.0/16 address space. The remote worker will output to stdout when you run it. Scan for any errors. You should see the message woot! I'm online.
- A successfully connected worker will show up on the Resource management page on the Partek Flow server. This can be reached from the main homepage or by clicking Resource management from the Settings page. Once you have confirmed the worker can connect, kill the remote worker (CTRL-C) from the terminal in which you started it.
- Once everything is working, return to library file management and add the genomes/indices required by your research team. If Partek hosts these genomes/indices, these will automatically be downloaded by Partek Flow
Integration with your queueing system
- In effect, all you are doing is submitting the following command as a batch job to bring up remote workers: /home/flow/PartekFlowRemoteWorker/partekFlowRemoteWorker.sh head-node.local compute-0
- The second parameter for this script can be obtained automatically via:
$(hostname -s)
Bringing up workers
Bring up workers by running the command below. You only need to run one worker per node:
/home/flow/PartekFlowRemoteWorker/partekFlowRemoteWorker.sh head-node.local compute-0
Shutting down workers
Go to the Resource management page and click on the Stop button (red square) next to the worker you wish to shut down. The worker will shut down gracefully, as in it will wait for currently running work on that node to finish, then it will shut down.
Updating Partek Flow
For the cluster update, you will get a link of .zip file for Partek Flow and remote Flow worker respectively from Partek support, all of the following actions should be performed as the Linux user that runs Flow. Do NOT run Flow as root.
- Go to the Flow installation directory. This is usually the home directory of the Linux user that runs Flow and it should contain a directory named "partek_flow". The location of the Flow install can also be obtained by running ps aux | grep flow and examining the path of the running Flow executable.
- Shut down Flow: ./partek_flow/stop_flow.sh
Download the new version of Flow and the Flow worker:
wget --content-disposition http://packages.partek.com/linux/flow
wget --content-disposition http://packages.partek.com/linux/flow-worker- Make sure Flow has exited:
ps aux | grep flow
The flow process should no longer be listed. - Unpack the new version of Flow install and backup the old install:
mv partek_flow partek_flow_prev
mv PartekFlowRemoteWorker PartekFlowRemoteWorker_prev - Backup the Flow database folder. This should be located in the home directory of the user that runs Flow.
tar -czvf partek-db-bkp-date.tgz ~/.partekflow - Start the updated version of Flow:
./partek_flow/start_flow.sh
tail -f partek_flow/logs/catalina.out (make sure there is nothing of concern in this file when starting up Flow. You can stop the file tailing by typing: CTRL-C)You may also want to examine the the main Flow log for errors:
~/.partekflow/logs/flow.log
Additional Assistance
If you need additional assistance, please visit our support page to submit a help ticket or find phone numbers for regional support.


| You are unable to rate this content due to the filter settings. | Results: |

|
0 | rates |
Overview
Content Tools
1 Comment
Melissa del Rosario
author: mdelrosario