Page History
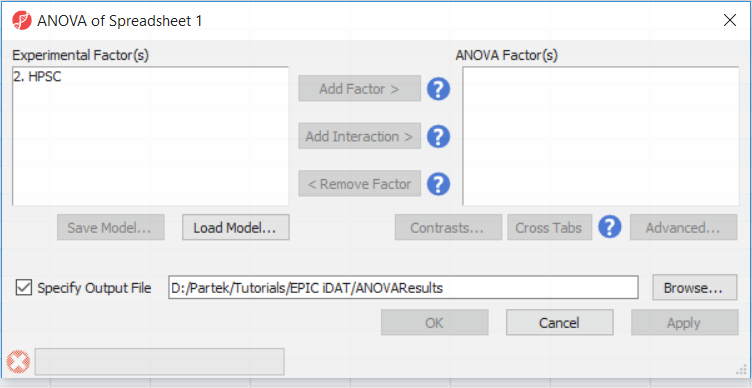
To detect differential methylation between CpG loci in different HSCP populations, go to Analysis > Detect Differential Methylation. In the ANOVA dialog (Figure 1), select Add Factor to move the factor 2. HPSC from Experimental Factor(s) to the ANOVA Factor(s) box. experimental groups, we can perform an ANOVA test. For this tutorial, we will perform a simple two-way ANOVA to compare the methylation states of the two experimental groups.
- Select Detect Differential Methylation from the Analysis section of the Illumina BeadArray Methylation workflow
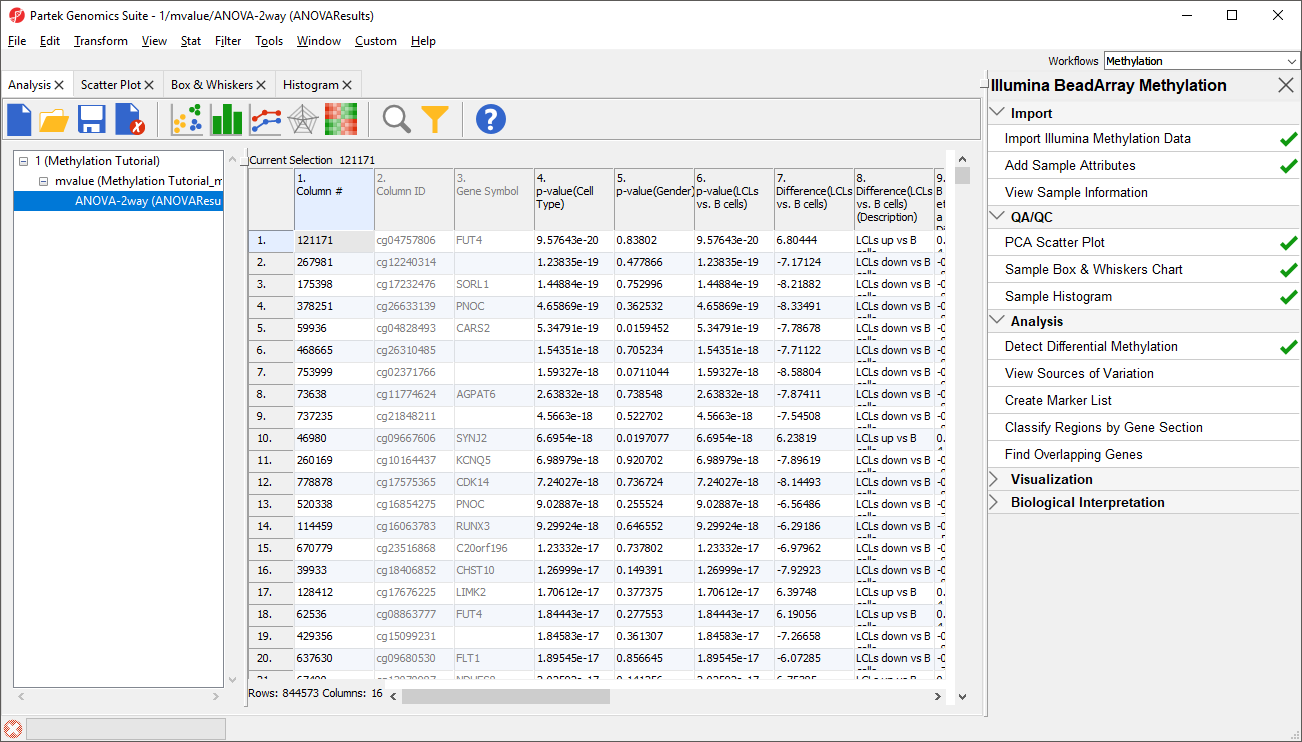
A new child spreadsheet, mvalue, is created when Detect Differential Methylation is selected. M-values are an alternative metric for measuring methylation. β-values can be easily converted to M-values using the following equation: M-value = log2( β / (1 - β)).
An M-value close to 0 for a CpG site indicates a similar intensity between the methylated and unmethylated probes, which means the CpG site is about half-methylated. Positive M-values mean that more molecules are methylated than unmethylated, while negative M-values mean that more molecules are unmethylated than methylated. As discussed by Du and colleagues, the β-value has a more intuitive biological interpretation, but the M-value is more statistically valid for the differential analysis of methylation levels.
Because we are performing differential methylation analysis, Partek Genomics Suite automatically creates an M-values spreadsheet to use for statistical analysis.
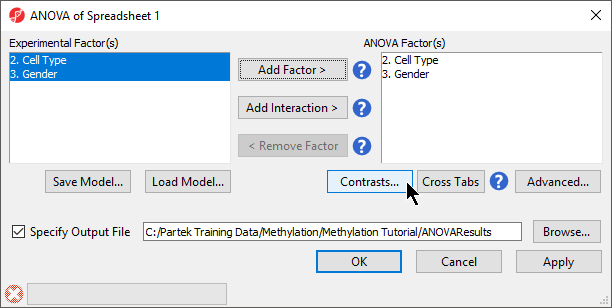
- Select 2. Cell Type and 3. Gender from the Experimental Factor(s) panel
- Select Add Factor > to move 2. Cell Type and 3. Gender to the ANOVA Factor(s) panel (Figure 1)
| Numbered figure captions | ||||
|---|---|---|---|---|
| ||||
|
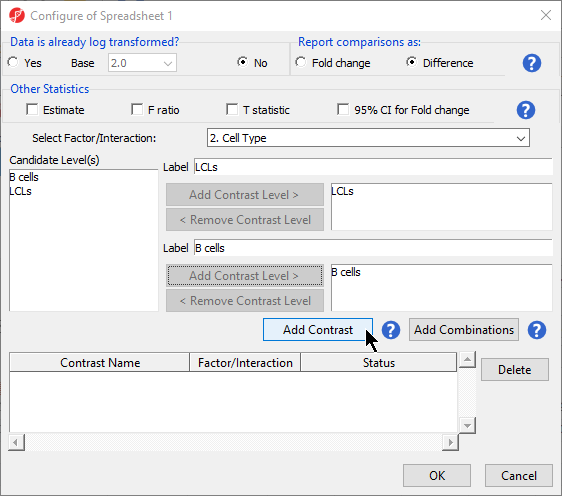
Depending on the data in the top level (i.e. parent) spreadsheet you may need to manually specify whether the data is already log transformed: you should select Yes for M-values, as they are based on logit transformation (Figure 2). By default, Partek Genomics Suite will calculate fold-change value for each contrast and, in addition to that, if you want to include the difference in methylation levels between the groups at each CpG site in the output, check the Estimate box in the Other Statistics section of the dialog (Figure 2). The setup of the contrasts has implications on downstream steps, in particular on filtering the differentially methylated loci.
| Numbered figure captions | ||||
|---|---|---|---|---|
| ||||
|

...
- Select Contrasts...
- Leave Data is already log transformed? set to No
- Leave Report comparisons as set to Difference
For methylation data, fold-change comparisons are not appropriate. Instead, comparisons should be reported as the difference between groups.
- Select 2. Cell Type from the Select Factor/Interaction drop-down menu
- Select LCLs
- Select Add Contrast Level > for the upper group
- Select B cells
- Select Add Contrast Level > for the lower group
- Select Add Contrast (Figure 2)
| Numbered figure captions | |
|---|---|
|
...
|
...

...
Push OK to confirm the contrast (and close the contrast dialog) and again to start the ANOVA calculation.
...
| |
|
- Select OK to close the Configuration dialog
The Contrasts... button of the ANOVA dialog now reads Contrasts Included
- Select OK to close the ANOVA dialog and run the ANOVA
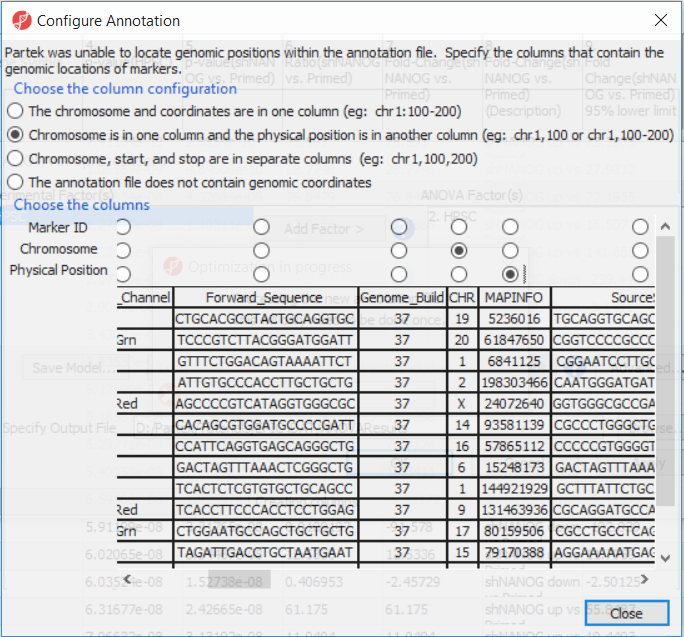
If this is the first time you have analyzed a MethylationEPIC array using the Partek Genomics Suite software, the manifest file may need to be configured. If it needs configuration, the Configure Annotation dialog will appear (Figure 3).
- Select Chromosome is in one column and the physical location is in another column
...
- for Choose the column configuration
- Select Ilmn ID for Marker ID
- Select CHR for Chromosome i
- Select MAPINFO for Physical Position
- Select Close
This enables Partek Genomics Suite to parse out probe annotations from the manifest file.
| Numbered figure captions | ||||
|---|---|---|---|---|
| ||||
|
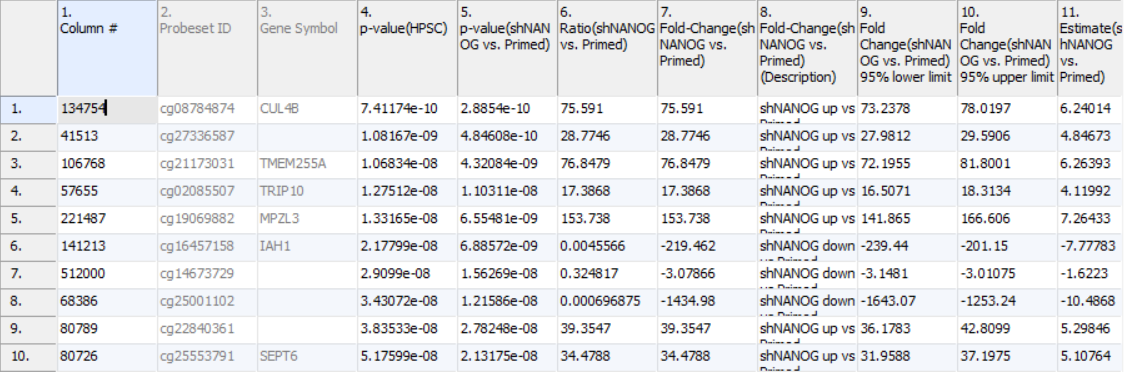
Column 3. Gene Symbol: the gene overlapping the probe as specified in the Illumina manifest file
Column 4. p-value(HPSC): overall p-value for the specified factor (in parenthesis). A low p-value indicates that there is a difference in methylation between the levels of this attribute (i.e. study groups). The contrast p-values should then be used to evaluate individual group comparisons. If more than one factor is included in the model, p-value will be reported for each.
Next, for each contrast included in the model, a block of seven columns will be added, as follows:
Column 5. p-value(shNANOG vs. Primed): p-value for the given contrast (in parenthesis). A low p-value indicates a difference in methylation between the groups included in the contrast (here: shNANOG and Primed).
Column 6. Ratio(shNANOG vs. Primed): ratio of average methylation level in one over the other the other contrasted group (shNANOG and Primed, respectively). Ratio is reported in linear space.
Column 7. Fold Change(shNANOG vs. Primed): fold-change in one over the other contrasted group (shNANOG and Primed, respectively). Fold-change is reported in linear space.
Column 8. Fold Change(shNANOG vs. Primed) (Description): if fold-change > 1, it means hypermethylation in the first group (e.g. shNANOG up vs Primed), if fold-change < -1, it means hypomethylation in the first group (e.g. shNANOG down vs Primed), relative to the second group (Primed). This column enables quick filtering
Columns 9. & 10. Lower and upper (respectively) limits of 95% confidence interval of the fold-change
Column 11. Estimate(shNANOG vs. Primed): difference between means of two groups (i.e. shNANOG and Primed) (this column is optional and depends on the way contrasts were set up)
Columns 12. - 18. correspond to columns 5. - 11.
Columns 19.+ Statistical output
| Numbered figure captions | ||||
|---|---|---|---|---|
| ||||
|
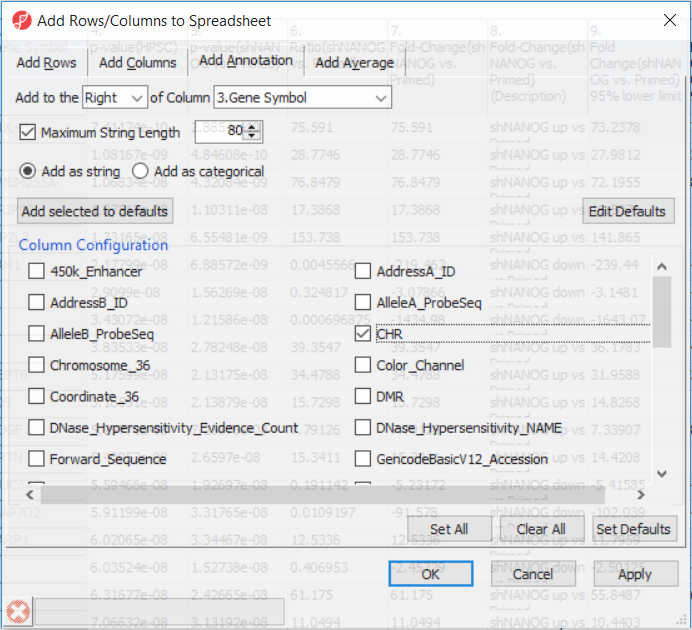
Going forward, analysis of differentially methylated loci typically includes removal of the probes on X and Y chromosomes (to avoid the problems with inactivation of one X chromosome). Another common filtering is removal of probes with known single nucleotide polymorphisms (SNP) close to the interrogation site. To annotate the ANOVA spreadsheet with the information required for filtering, right-click on the Gene Symbol column, select Insert Annotation, tick-mark the CHR and SNP_DISTANCE fileds (Figure 6) and push OK. Two new columns will be appended to the spreadsheet.
| Numbered figure captions | ||||
|---|---|---|---|---|
| ||||
|
Section Heading
Section headings should use level 2 heading, while the content of the section should use paragraph (which is the default). You can choose the style in the first dropdown in toolbar.
|
| Page Turner | ||
|---|---|---|
|
| Additional assistance |
|---|
|
| Rate Macro | ||
|---|---|---|
|
Overview
Content Tools