Page History
| Table of Contents | ||||||
|---|---|---|---|---|---|---|
|
With the Partek Flow REST API, you can create custom solutions to query or drive your server.
The API reference documentation is available here: REST API for Partek Flow
The public key and Python libraries are available here: PartekFlow-REST.zip
Below are some common use cases for the REST API:
| Table of Contents | ||||||
|---|---|---|---|---|---|---|
|
A complete reference for the API can be found on the REST API Command List or by visiting [server]/api/v1/servlets
The referenced Python library can be downloaded here.
Generate an authentication token
An access token can be generated from the System information section of the settings page.

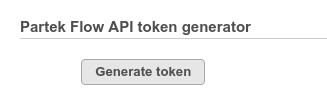
Alternatively, GetToken.py will generate a token.:
...
| Code Block | ||
|---|---|---|
| ||
python GetToken.py --server localhost:8080 --user admin |
Example output:
TOKEN: cUOWY0VvkSFagrDUANVtM7A8SPal8Gx0cf0ee24bfa9fe68e2b5564dab2b6a27e1fb525e5...
This token can be specified as the --password parameter for the Python API.
If the token is not supplied, then the Python API will prompt for the password and encrypt it.
When accessing the API directly, the encrypt parameter must be specified with the RSA value to use the token.
For example:
curl --form username=admin --form encrypt=RSA --form password=cUOWY0VvkSFagr... http://localhost:8080/flow/api/v1/users/list
Upload and analyze a group of samples.
Get you will be prompted to enter your password.
This token can be specified as the token parameter.
| Code Block | ||
|---|---|---|
| ||
curl --form token=cUOWY0VvkSFagr... http://localhost:8080/flow/api/v1/users/list |
Create a project
Flow organizes data by projects and they can be created and managed by the REST API.
To create a project:
| Code Block | ||
|---|---|---|
| ||
curl -X POST --form token=$FLOW_TOKEN --form project="My Project" http://localhost:8080/flow/api/v1/projects |
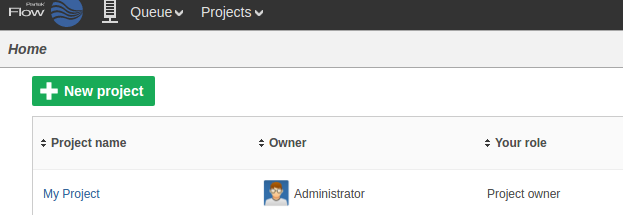
The server will respond with JSON data describing the new project:
| Code Block |
|---|
{"name":"My Project","id":"0","description":"","owner":"0","userRoles":{"0":"Project owner"},"outputFolders":{"0":"/home/flow/FlowData/Project_My Project"},"diskUsage":"0 GB","lastModifiedTimeStamp":1506013662476,"lastModifiedDate":"12:00 PM","data":[]} |
The new project will appear on the Flow homepage:
Upload a group of samples
UploadSamples.py is a python script that can create samples within a project by uploading files:
| Code Block | ||
|---|---|---|
| ||
 python UploadSamples.py --verbose --token $FLOW_TOKEN --server http://localhost:8080 --project "My Project" \
--files ~/MoreData/REST/sample1.fastq.gz ~/MoreData/REST/sample2.fastq.gz ~/MoreData/REST/sample3.fastq.gz ~/MoreData/REST/sample4.fastq.gz |
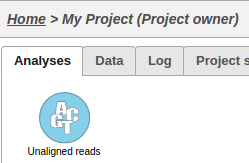
This operation will generate a data node on the Analyses tab for the imported samples:
Assign sample attributes
We can associate attributes with samples for use in visualizations and statistical analysis:
| Code Block | ||
|---|---|---|
| ||
python AddAttribute.py -v --server http://localhost:8080 --token $FLOW_TOKEN --project_name "My Project" --sample_name sample1 --attribute Type --value Case
python AddAttribute.py -v --server http://localhost:8080 --token $FLOW_TOKEN --project_name "My Project" --sample_name sample2 --attribute Type --value Case
python AddAttribute.py -v --server http://localhost:8080 --token $FLOW_TOKEN --project_name "My Project" --sample_name sample3 --attribute Type --value Control
python AddAttribute.py -v --server http://localhost:8080 --token $FLOW_TOKEN --project_name "My Project" --sample_name sample4 --attribute Type --value Control
|
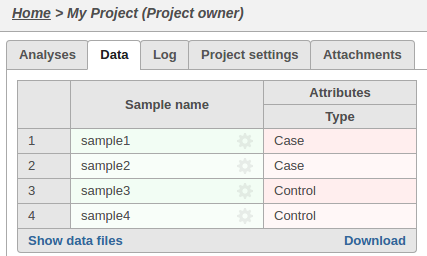
The sample attributes can be viewed and managed on the data tab:
Run a pipeline
A pipeline is a series of tasks used to process and analyze genomic data. You can read more about pipelines here
To run a pipeline, first we need to know its name.
We can get the name of a pipeline from the GUI or from the API:
| Code Block | ||
|---|---|---|
| ||
wget -q -O - http://localhost:8080/flow/api/v1/pipelines/ |
...
...
list$AUTHDETAILS | python -m json.tool | gvim -
|
Many pipelines also require that library files are specified.
You can get the list of required inputs for the pipeline from the API:
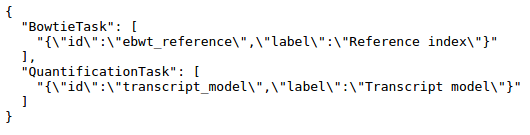
http://localhost:8080/flow/api/v1/pipelines/inputs?project_id=iDEA0&pipeline=AlignAndQuantify
This particular pipeline requires a bowtie index and an annotation model:
The request to launch the pipeline needs to specify one resource ID for each input.
These IDs can be found using the API:
Get the IDs for the library files that match the required inputs
| Code Block |
|---|
wget -q -O - "http://localhost:8080/flow/api/v1/library_files/ |
...
list${AUTHDETAILS}&assembly=hg19 |
...
...
" | python -m json.tool | gvim - |
| Code Block |
|---|
[
    {
        "annotationModel": "",
        "assembly": "hg19",
        "description": "Reference sequence",
        "fileType": "Genome sequence",
        "id": 100
    },
    {
        "annotationModel": "",
        "assembly": "hg19",
        "description": "Cytoband",
        "fileType": "cytoBand.txt",
        "id": 101
    },
    {
        "annotationModel": "",
        "assembly": "hg19",
        "description": "Bowtie index",
        "fileType": "Bowtie Index",
        "id": 102
    },
    {
        "annotationModel": "hg19_refseq_15_05_07_v2",
        "assembly": "hg19",
        "description": "Annotation file: hg19_refseq_15_05_07_v2",
        "fileType": "Annotation model",
        "id": 103
    }
] |
The pipeline can be launched in any project using RunPython.py
| Code Block | ||
|---|---|---|
| ||
python RunPipeline.py -v --server http://localhost:8080 --token $FLOW_TOKEN --project_id 0 --pipeline AlignAndQuantify --inputs 102,103 |
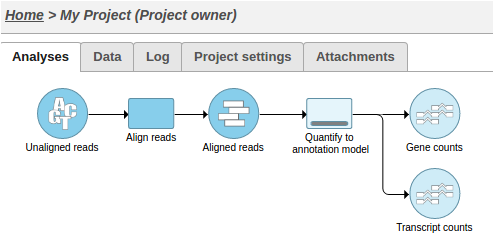
This action will cause two tasks to start running:
Alternatively, UploadSamples.py can create the project, upload the samples and launch the pipeline in one step:
| Code Block | ||
|---|---|---|
| ||
python UploadSamples.py -v --server http://localhost:8080 -- |
...
token $FLOW_TOKEN --files ~/ |
...
sampleA.fastq.gz ~/ |
...
sampleB.fastq.gz --project |
...
NewProject --pipeline AlignAndQuantify --inputs |
...
102, |
...
103 |
Add a collaborator to a project
To add a collaborator to a project:
| Code Block | ||
|---|---|---|
| ||
curl -X PUT "http://localhost:8080/flow/api/v1/projects?project=ProjectName&collaborator=user1&role=Collaborator& |
...
token=$FLOW_TOKEN" |
Transfer feature lists
| Code Block | ||
|---|---|---|
| ||
curl --form token=$TO_TOKEN --form url=http://from:8080/flow/api/v1/feature_lists/export?token=$FROM_TOKEN http://to:8080/flow/api/v1/feature_lists/import |
Monitor a folder and upload files as they are created
| Code Block | ||
|---|---|---|
| ||
#!/bin/bash |
...
inotifywait -m $PATH_TO_MONITOR -e create -e moved_to |
...
while read path action file; do
...
| while read path action file; do if [[ $file == *.fastq.gz ]]; |
...
echo "Uploading $file"
python UploadSamples.py -v --server $SERVER --user $USER --password $TOKEN --files $path/$file --project "$PROJECT"
fi
done
 then
              echo "Uploading $file"
              python UploadSamples.py -v --server $SERVER --token $FLOW_TOKEN --files $path/$file --project "$PROJECT"
      fi
done |
Monitor the queue and send a notification if there are too many waiting tasks
| Code Block | ||
|---|---|---|
| ||
#!/bin/bash |
...
while true; |
...
do result=`python QueueStatistics.py --server $SERVER -- |
...
token $TOKEN --max_waiting $MAX_WAITING` |
...
if [ $? -eq 1 ]; |
...
then /usr/bin/notify-send |
...
exit 1
fi
sleep $INTERVAL
done
...
 $result
              exit 1
      fi
      sleep $INTERVAL
done |
| Additional assistance |
|---|
| Rate Macro | ||
|---|---|---|
|
...
Overview
Content Tools