Only use this method if encounter issues using Transfer file function on Flow homepage, contact support@partek.com to obtain private key.
Introduction
The following instructions detail the use of SFTP (Secured File Transfer Protocol) to transfer data to and from your Partek Flow instance. SFTP offers significant performance and security enhancements over FTP for file transfers. It also enables the use of robust file syncing utilities, e.g. RSYNC, and is compatible with common file transfer programs such as FileZilla and WinSCP.
To transfer files with SFTP, you will need to have your Partek Flow:
Server Name. Example: myname.partek.com
Username. Example: flowloginname
- Private authentication key
This information should have been e-mailed to you from the Partek licensing team. If you lose this information, contact Partek support and we will resend your authentication key to you.
SFTP with WinSCP
WinSCP is an open source, free SFTP client for Windows. Its main function is file transfer between a local and a remote computer.
Downloading WinSCP
To download WinSCP, visit WinSCP's official site: https://winscp.net/eng/download.php On the WinSCP page you may need to scroll a bit down, to reach the green button Download WinSCP.
 Figure 1. Download button on WinSCP's official web site. Note: the version may change from the time of writing of this document
Connecting to your Partek server with WinSCP
Download and install WinSCP on your local computer and then launch the program.
- On the Login page click on the New Site icon.
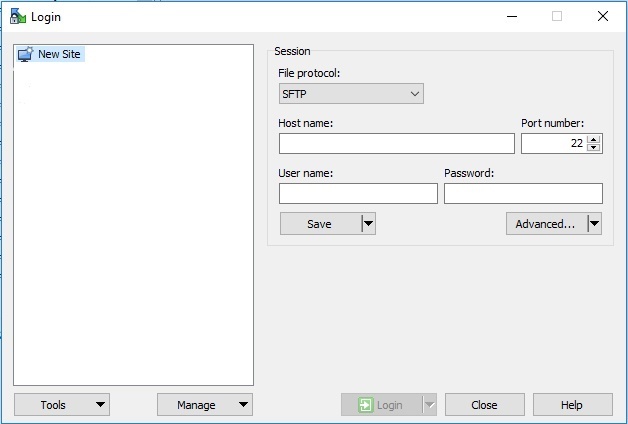 Figure 2. Adding NewSite on WinSCP's Login page
- Type in the Host Name, which is the same as the web address that you use to access your instance of Partek Flow
The web address for your instance of Partek Flow has been sent to you by Partek's Licensing team. In this example, the web address is ilukic5i.partek.com.
- Type in the User name, that has also been sent to you (and is the same user name that you use to log on to Partek Flow). In this example, the web address is lukici.
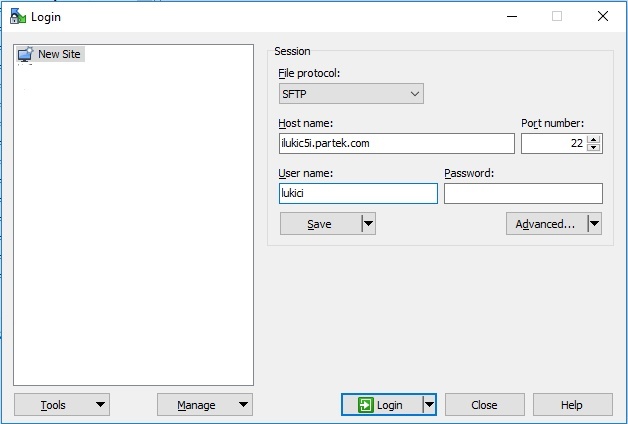 Figure 3. Adding Host name and User name information. Use the host and user name that has been sent to you by Partek's licensing team
- To proceed click on the Advanced... button
- Then select the Authentication in the SSH section of the Advanced Site Settings dialog
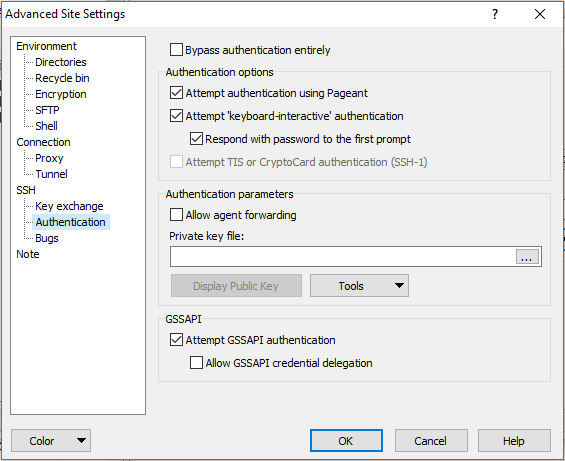 Figure 4. Adding the id_rsa file to WinSCP. Use the Advanced Site Settings tab and select Authentication
- Select the ... button (under Private key file) to browse for the id_rsa file.
The file has been sent to you by Partek's licensing team attached to the same email that gave you your URL and username.
- If you do not see it in the Select private key file browser, switch to All Files (*.*)
 Figure 5. Showing all files in the Select private key file dialog
- Click Open
WinSCP will ask you to confirm file format conversion
- Click OK.
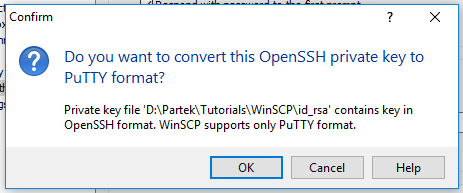 Figure 6. Converting key file format
WinSCP will create a file in .ppk format.
Figure 6. Converting key file format
WinSCP will create a file in .ppk format.
- Click Save to save the converted key file, id_rsa.ppk, to a secure location on your local computer.
- Click OK again to confirm the change.
Your private key has been saved in .ppk format and added to WinSCP
- Click OK to proceed
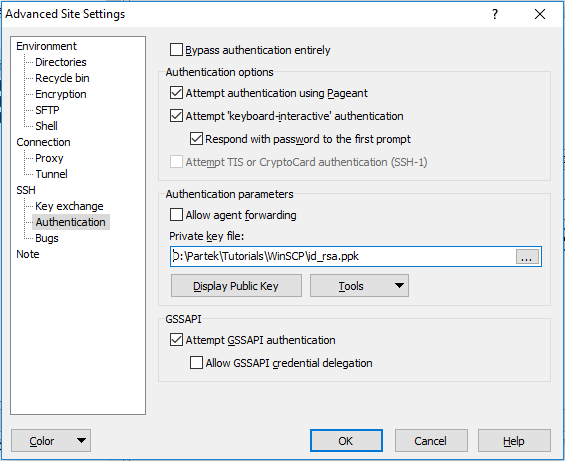 Figure 7. Private key in .ppk format added to WinSCP
- Click Save to save the new WinSCP settings.
This will open the Save session as site dialog. You can accept the default name (in this example lukici@ilukic5i.partek.com) or add a custom name. The name that you specify here will appear in the left panel of the Login dialog.
- Once you have made your edits, click OK.
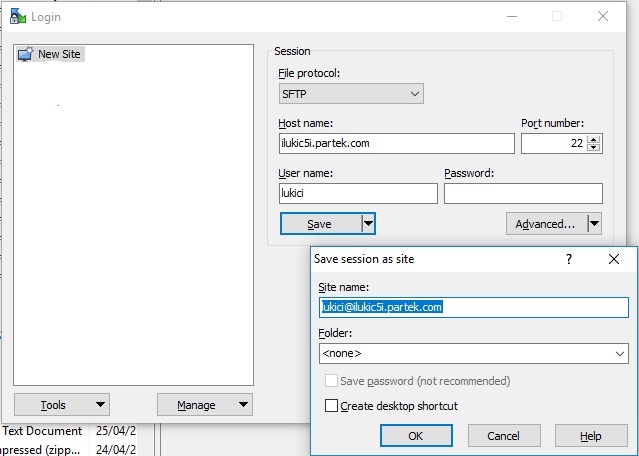 Figure 8. Customising the name for the new site on the Login dialog. In this example, the name is lukici@ilukic5i.partek.com
- On the Login page, select your newly created site (in this example: lukici@ilukic5i.partek.com) and click the Login button.
The first time you connect, a warning message will appear, asking you whether you want to connect to an unknown server.
- Click Yes to proceed.
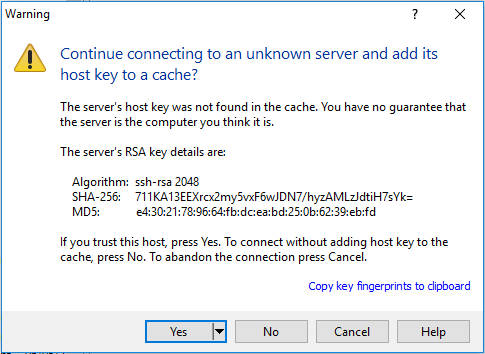 Figure 9. The first time you connect to your Partek server, WinSCP will present a warning message. Click Yes to connect to the server
The progress towards establishing a connection will be displayed in a dialog. This process is automatic and you do not need to do anything.
Figure 9. The first time you connect to your Partek server, WinSCP will present a warning message. Click Yes to connect to the server
The progress towards establishing a connection will be displayed in a dialog. This process is automatic and you do not need to do anything.
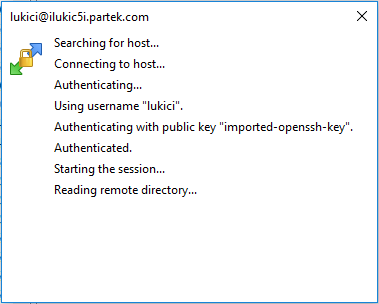 Figure 10. Progress of the connection to your Partek server will be displayed on the screen
The WinSCP interface includes is split into two panels. The panel on the left shows the directory structure of your local computer and the panel on the right shows the directory structure of your Partek Flow file server.
Figure 10. Progress of the connection to your Partek server will be displayed on the screen
The WinSCP interface includes is split into two panels. The panel on the left shows the directory structure of your local computer and the panel on the right shows the directory structure of your Partek Flow file server.
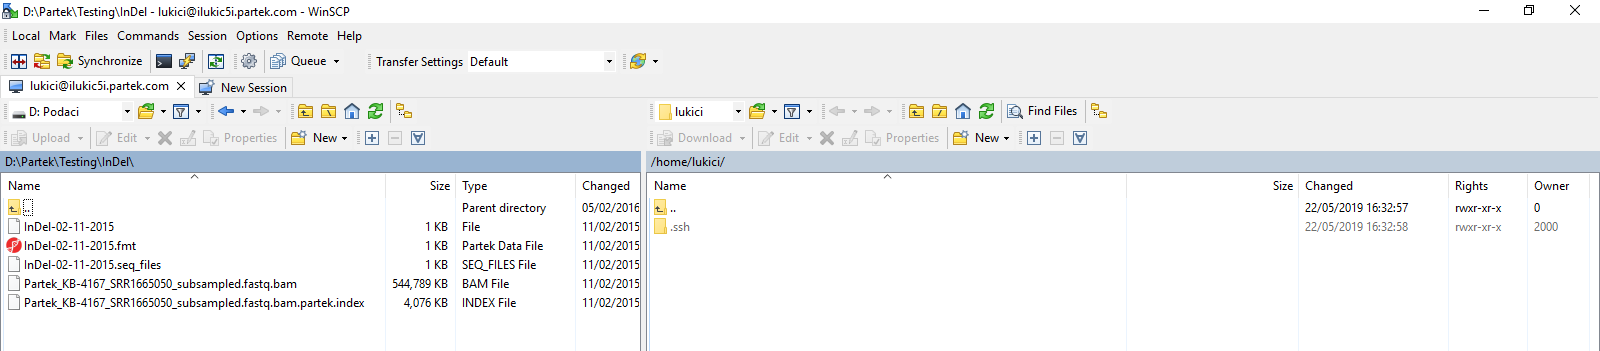 Figure 11. WinSCP screen after connection divides into two panels: the files one the left are on the local computer, while the files on the right are on Partek server
To transfer a file, just drag and drop the file from one panel to the other. The progress of your transfer will be shown on the screen.
Figure 11. WinSCP screen after connection divides into two panels: the files one the left are on the local computer, while the files on the right are on Partek server
To transfer a file, just drag and drop the file from one panel to the other. The progress of your transfer will be shown on the screen.
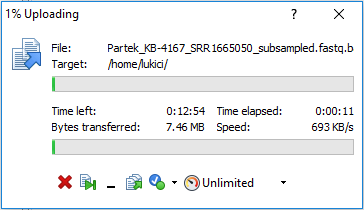 Figure 12. Progress of file transfer is shown on screen
SFTP with FileZilla
FileZilla is a graphical file transfer tool that runs on Windows, OSX, and Linux. It is great when needing to do bulk transfers as all transfers are added to a queue and processed in the background. It is possible to browse your files on the Partek Flow server while transfers are active. This is also the best solution when you are not on a computer with command line access or you are uncomfortable with command line operations.
Downloading FileZilla
We recommend downloading the FileZilla install packages from us. They are also available from download aggregator sites (e.g. CNET, download.com, sourceforge) but these sites have been known to bundle adware and other unwanted software products into the downloads they provide, so avoid them.
Mac OSX:
http://packages.partek.com/bin/filezilla/fz-osx.app.tar.bz2
Windows 32-bit:
http://packages.partek.com/bin/filezilla/fz-win32.exe
Windows 64-bit:
http://packages.partek.com/bin/filezilla/fz-win64.exe
Linux (Please use your distribution's package manager to install Filezilla):
Ubuntu:
$ sudo apt-get update
$ sudo apt-get install filezilla
RedHat, see the following guide:
http://juventusitprofessional.blogspot.com/2013/09/linux-install-filezilla-on-centos-or.html
OpenSuse, see:
https://software.opensuse.org/package/filezilla
Connecting to your Partek server with FileZilla
After starting FileZilla, click on the Site Manager icon located at the top left corner of the FileZilla window.
Figure 13.
Click on the New Site button on the left of the popup dialog.
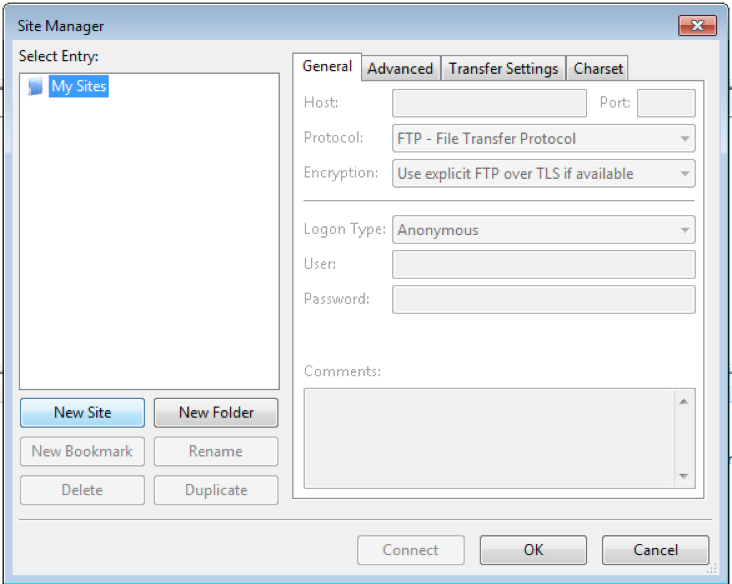 Figure 14.
Type in a name for the connection. Example: “Partek SFTP”.
Figure 14.
Type in a name for the connection. Example: “Partek SFTP”.
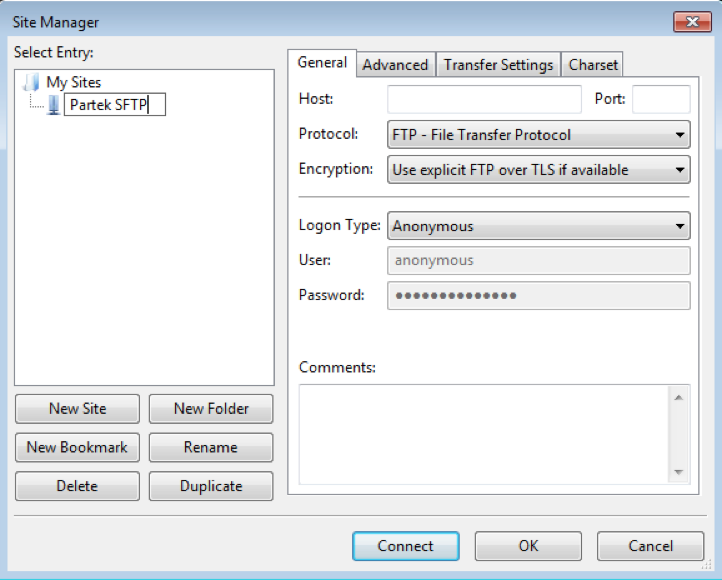 Figure 15.
The connection details to the right need to be changed to reflect the information you received via email. The default settings will NOT work.
Figure 15.
The connection details to the right need to be changed to reflect the information you received via email. The default settings will NOT work.
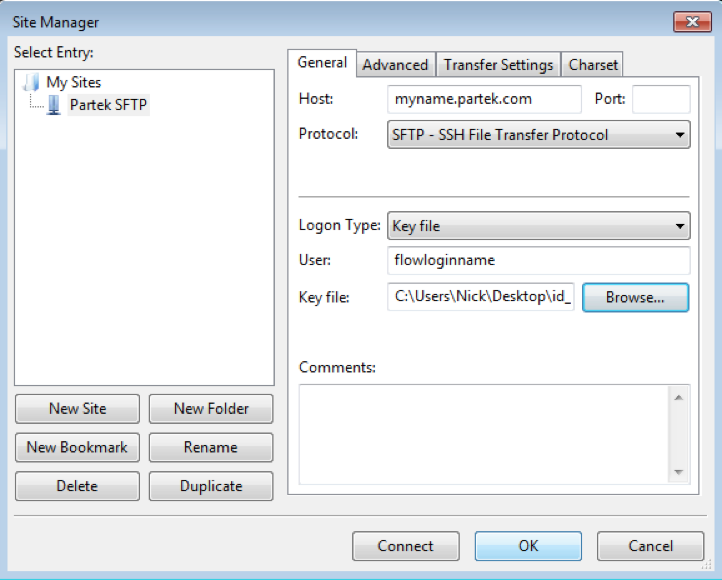 Figure 16.
Set Host: to your partek server name
Leave Port: blank
Change Protocol: to SFTP - SSH File Transfer Protocol
Change User: to your Partek Flow login name
Change Logon Type: to Key File and select the key file received via email.
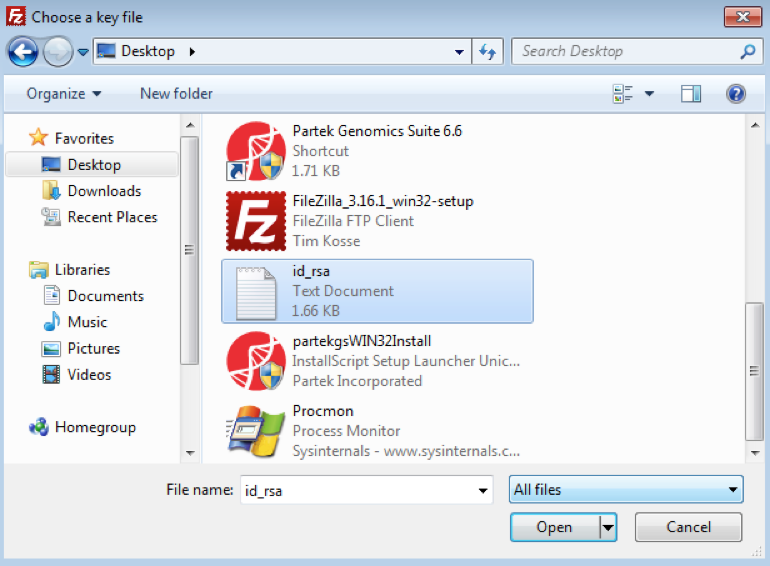 Figure 17.
When selecting your key file, change the file selection from its default of PPK files to All files. Otherwise you key file will not be visible in the file browser.
Figure 17.
When selecting your key file, change the file selection from its default of PPK files to All files. Otherwise you key file will not be visible in the file browser.
After selecting your key file, click the Connect button.
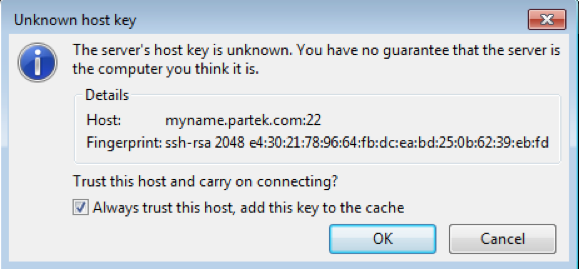 Figure 18.
Click the checkbox to always trust this host and click OK. Once connected, you can begin to browse and transfer files. The files and folders to the left are on your computer, the ones on the right are on the Flow server.
Figure 18.
Click the checkbox to always trust this host and click OK. Once connected, you can begin to browse and transfer files. The files and folders to the left are on your computer, the ones on the right are on the Flow server.
 Figure 19.
When you need to reconnect to your server, run FileZilla and click the down arrow next to the Site Manager icon, then select Partek SFTP.
Figure 19.
When you need to reconnect to your server, run FileZilla and click the down arrow next to the Site Manager icon, then select Partek SFTP.
SFTP command line usage
Importing your private authentication key
You will receive a file called id_rsa via email. Download this file, note where you downloaded it to, then use ssh-add to import the key. If you logout or reboot your computer, you will need to re-run the commands below. After key import, you will not be asked a password when transferring files to your Partek Flow server.
$ cd directory/with/key
$ chmod 600 id_rsa
$ eval $(ssh-agent)
$ ssh-add id_rsa
Copying files and folders between your Partek Flow server and local computer
RSYNC usage
RSYNC is useful when resuming a failed transfer. Instead of re-uploading or downloading what has already been transferred, RSYNC will copy only what it needs.
The command below will sync the folder "local_folder" with the "remote_folder" on Partek's servers. To transfer in the other direction, reverse the last two parameters.
$ rsync -avr --progress ./local_folder/ flowloginname@myname.partek.com:~/remote_folder/
With rsync, don't forget the trailing '/' on directory names.
Before moving the files, we strongly advise you to use FileZilla to explore the directory structure of the Partek server and then create a new directory to transfer the files to.
Points of Caution
When you delete files from the Partek Flow server they are gone and can not be recovered.
Please use Partek Flow to delete projects and results. Manually removing data using SFTP could break your server.
Wait until ALL input data for a particular project has been transferred to the Partek Flow server before importing data via Partek Flow. If you try to import samples while the upload is occurring the import job will crash.
- When upload raw data to Partek hosted Flow server, we recommend to a create subfolder for each experiment at the same level of "FlowData" folder or inside "FlowData" folder.
Additional Assistance
If you need additional assistance, please visit our support page to submit a help ticket or find phone numbers for regional support.


| Your Rating: |
|
Results: |

|
34 | rates |
Overview
Content Tools
1 Comment
Melissa del Rosario
author: nlyle