Partek® Flow® supports multiple user accounts, allowing you to keep your Partek Flow server secure and organized. This also facilitates data sharing and collaboration on projects. Administrative users have access to all parts of the software including server configuration, whereas non-administrative users only have access to the features necessary for data analysis. The first Partek Flow user account is created during installation, which is always an administrative user account.
Please note that Partek Flow users do not correspond to Linux or Mac users. A Partek Flow administrative account is not the same as a Linux ‘root’ user (see Glossary). All user accounts created in Partek Flow are internal to the Partek Flow server .
User management page
To access the User Management page, click the avatar in the top right corner, choose Settings and click User management on the left (Figure 1). This page can be accessed by administrative Partek Flow users only.
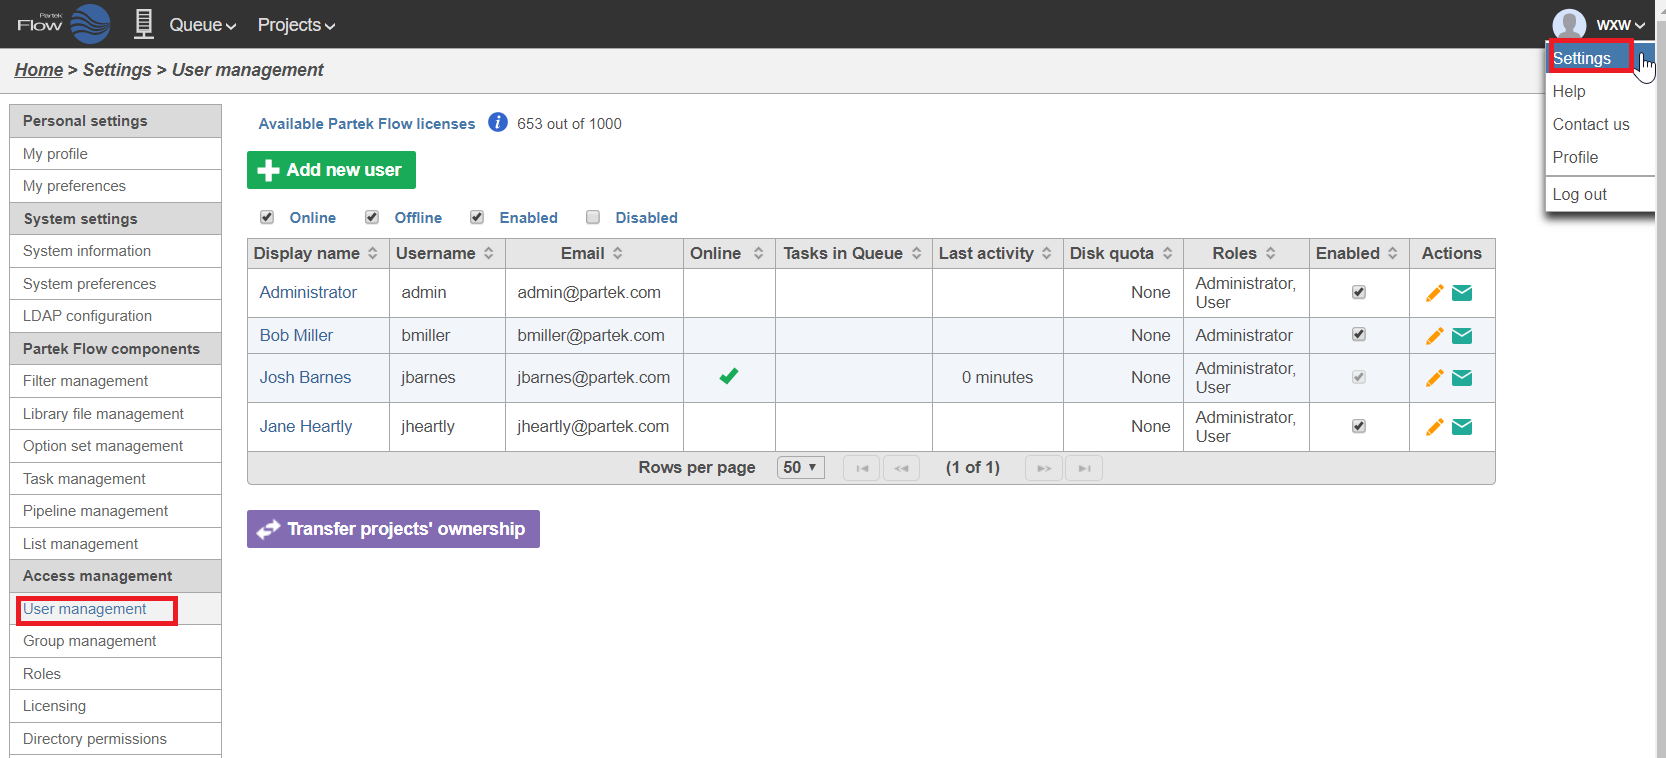 Figure 1. The User management page displaying all enabled Partek Flow users on a Partek Flow instance. The checkboxes above the table control which users are displayed in the table below. Note that Disk quota is a licensed feature, this column will not appear in Partek Flow lab edition.
The number of available Partek Flow user licenses is displayed at the top of the User management page. This shows the number of user accounts that can be enabled. Administrative user accounts will not consume licenses, unless they become a member of any project, in which case they will consume a Partek Flow user licence. Please contact your account manager or email licensing@partek.com if you wish to increase the number of user licenses on your Partek Flow instance. If all available user licenses have been consumed, you will have to disable a user account before adding a new user. Disabled user accounts are easily re-enabled.
Figure 1. The User management page displaying all enabled Partek Flow users on a Partek Flow instance. The checkboxes above the table control which users are displayed in the table below. Note that Disk quota is a licensed feature, this column will not appear in Partek Flow lab edition.
The number of available Partek Flow user licenses is displayed at the top of the User management page. This shows the number of user accounts that can be enabled. Administrative user accounts will not consume licenses, unless they become a member of any project, in which case they will consume a Partek Flow user licence. Please contact your account manager or email licensing@partek.com if you wish to increase the number of user licenses on your Partek Flow instance. If all available user licenses have been consumed, you will have to disable a user account before adding a new user. Disabled user accounts are easily re-enabled.
The table on the User management page displays user account information and status, with one user account per row. By default, the table will display all enabled users accounts that are online and offline. To change which users are displayed, select or deselect the checkboxes above the table (Figure 1).
Creating a new Partek Flow user account using an LDAP database
New Partek Flow user accounts can be created using username and password credentials from a Lightweight Directory Access Protocol (LDAP) database, if configured. You can create user accounts without using an LDAP database too.
- Click the green Add new user icon (
) at the top of the User management page
- Select the Source is … checkbox in the Add user dialog (Figure 2)
- Start typing a few characters of the username you wish to add in the Username box and Partek Flow will suggest users that are available on your LDAP database. Select one of the suggested usernames and the Username, Display Name and Email will autocomplete. You can change the Display name if necessary
- There may be more than one email address associated with a user in the LDAP database, so choose the correct one from the Email drop-down list
- To give the new user account administrative privileges, select the Adminstrator checkbox (optional)
- To set a disk space usage limit on the new user account, select the Disk quota radio button and type in the disk quota limit in GB (optional). This limit includes input and output files across all projects the new user will own. To allow unrestricted disk usage, select the None radio button. Disk quota preferences can be managed on the System preferences page. Note that setting disk quotas require an enterprise license
- Click Save
The new user account will be active immediately. The new user can log into the Partek Flow instance using the same username and password as their email account. Please note, the new user will not be able to manage their username and password settings from within Partek Flow, as this is determined by the LDAP server.
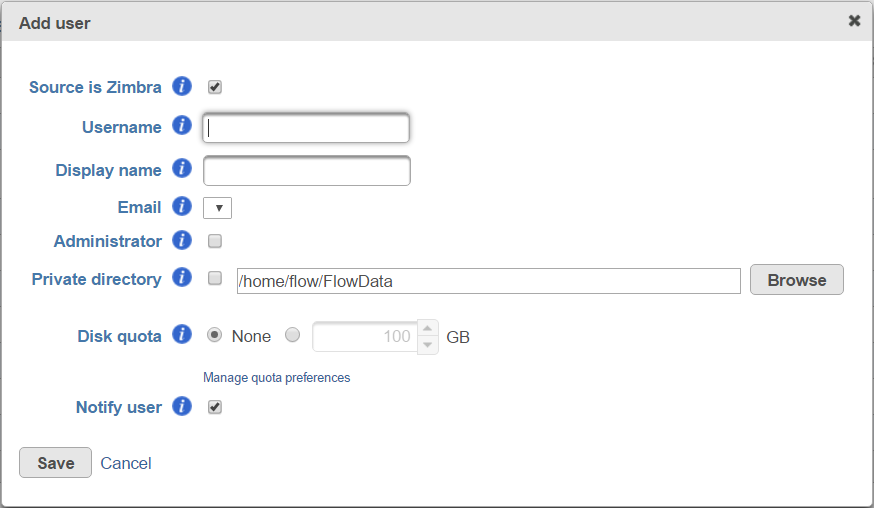 Figure 2. Add user dialog. Select the Source is ... checkbox to add a new user from an LDAP database. Deselect the Source is... checkbox to add a new user without using an LDAP database. Note ‘LDAP name’ will be replaced with the name of the database, if configured.
Creating a new Partek Flow user account without using an LDAP database
- Click the green Add new user icon (
- Deselect the Source is …checkbox in the Add user dialog (Figure 2)
- Type a username, display name and email address in the respective fields
- To give the new user account administrative privileges, select the Adminstrator checkbox (optional)
- To set a disk space usage limit on the new user account, select the Disk quota radio button and type in the disk quota limit in GB (optional). This limit includes input and output files across all projects the new user owns. To allow unrestricted disk usage, select the None radio button. Disk quota preferences can be managed on the System preferences page. Note that setting disk quotas require an enterprise license
- Click Save
The screen will return to the User management page and there will be a message at the top of the screen (Figure 3). The new user needs to click on the link sent via email and follow the on-screen instructions for creating a password.
 Figure 3. When a new user account has been created, a message will appear at the top of the User management page
Editing a Partek Flow user account
To edit user account details, click on the Edit icon () next to the user account in the Actions column (Figure 1). This will open the same dialog as in Figure 2, with the user account details filled out. An administrative user can make the necessary changes and click Save. Users can also edit some of their own details Personal settings.
Disabling a Partek Flow user account
To disable a user account, deselect the checkbox in the Enabled column in the table on the User management page (Figure 4). The user account will then disappear from the table.

 Figure 4. Disabling a user account. Once the checkbox in the Enable column has been deselected (top picture), the user account will not appear in the table (bottom picture)
To display disabled user accounts, select the Disabled check box above the table (Figure 5). Disabled accounts can be easily re-enabled by selecting the check box in the Enabled column (Figure 5).
Figure 4. Disabling a user account. Once the checkbox in the Enable column has been deselected (top picture), the user account will not appear in the table (bottom picture)
To display disabled user accounts, select the Disabled check box above the table (Figure 5). Disabled accounts can be easily re-enabled by selecting the check box in the Enabled column (Figure 5).
 Figure 5. Disabled user accounts can be viewed by selecting the Disabled checkbox above the table. A disabled user account can be easily re-enabled by selecting the checkbox in the Enabled column.
Additional Assistance
If you need additional assistance, please visit our support page to submit a help ticket or find phone numbers for regional support.


| Your Rating: |
|
Results: |

|
0 | rates |
Overview
Content Tools