The data set accompanying this document consists of eight human samples processed by Illumina MethylationEPIC BeadChip arrays. The data set is taken from a study of DNA methylation in human pluripotent stem cells (hPCS) (Lee et al. Cell Rep 2017) and can be downloaded from Gene Expression Omnibus using the following accession number: GSE95531. To follow this tutorial, download the 16 .idat files associated with GSE95531 (note that two .idat files are generated for each array) and unzip them on your local computer. A discussion on import of files processed by Illumina’s Genome Studio package can be found in Appendix A.
To load the .idat files to Partek Genomics Suite go to the Workflows drop down list, choose Methylation and then select Illumina BeadArray Methylation sub-workflow. That will open Illumina BeadArray Methylation workflow (Figure 1). Select Import Illumina Methylation Data and specify to Import human methylation 450/850 .idat files and push OK.
 Figure 1. Illumina Methylation BeadArray subworkflow
In the next dialog, use Browse… to point to the folder in which the .idat files were unzipped and use the Add File > button to move the .idat files to the box on the right (i.e. idat Files to Process; Figure 2). Select Next > to proceed.
 Figure 2. Use the file browser to locate .idat files for import
The following dialog (Figure 3) deals with the manifest file, i.e. probe annotation. If a manifest file is not present locally, it will be downloaded in the Microarray libraries directory automatically. The download will take place in the background, with no particular message on the screen and it may take a few minutes, depending on the internet connection. If you have already downloaded the manifest file, to use it, select Use Available Manifest File option. If you have multiple versions available, you can pick an alternative by selecting Manually specify. The latter scenario corresponds to the situation where you want to reanalyze a data set at a later time. To enforce reproducibility, you may want to use the same version of the manifest file that you used when the data was first processed, rather than downloading an up-to-date version.
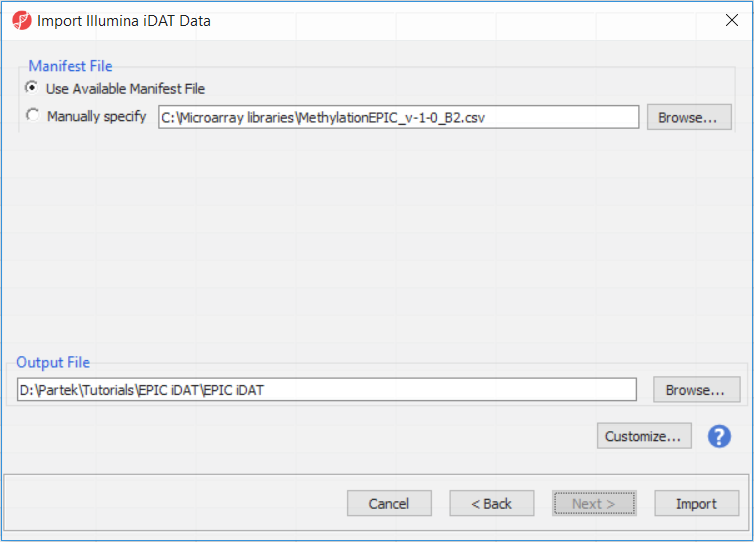 Figure 3. Manifest File section of the import dialog lets you to specify the version of the manifest file (probe annotation) that you want to use. Output File specifies the location of the spreadsheet that will be created after the .idat files are imported
The Customize... button enables a granular control of the import process (Figure 4).
Section Heading
Section headings should use level 2 heading, while the content of the section should use paragraph (which is the default). You can choose the style in the first dropdown in toolbar.
Additional Assistance
If you need additional assistance, please visit our support page to submit a help ticket or find phone numbers for regional support.


| Your Rating: |
|
Results: |

|
1 | rates |
Overview
Content Tools