Page History
...
| Numbered figure captions | ||||
|---|---|---|---|---|
| ||||
|
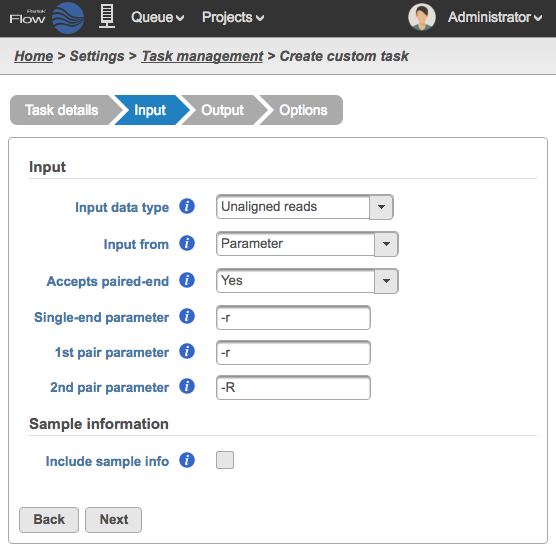
- Input data type - This is the type of data the task can be performed on. In the Analyses tabthe Analyses tab, this is the type of data node that will be selected for to the task to appear in the context-sensitive Task sensitive Task menu. Partek Flow requires User requires User added tasks to tasks to be performed on either: Unaligned reads, Aligned Aligned reads, and Variants. Additional Additional inputs can be specified in the Options step. The the Options step. The type of Input data selected from the drop-down menu will determine the additional fields that need to be defined. In Figure 7 the Subread Aligner task 7 the Subread Aligner task accepts Unaligned reads.
- Input from - choose Parameter if the if the input file(s) is specified using an option (e.g. -r) on the command line or Last or Last option if the executable assumes the input file(s) is placed at the end of the command
- Accepts paired-end - choose between Yes choose between Yes, No or Exclusively with respect to the task's behavior with pairedwith paired-end reads
- Single-end parameter - enter enter the parameter to add before single-end reads
- 1st pair parameter - enter the parameter enter the parameter to add before the first file (_1) in a paired-end reads set
- 2nd pair parameter - enter enter the parameter parameter to add before the first file (_2) in a paired-end reads set
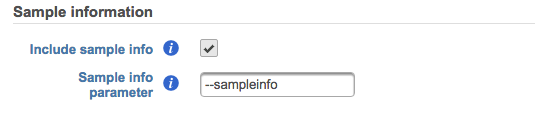
You can optionally include Sample information as as an argument to pass to the command (Figure 8). Select Include sample info and enter the Sample info parameter. The parameter is used to specify the sample information file on the command line.
| Numbered figure captions | ||||
|---|---|---|---|---|
| ||||
|
A tab-delimited text file will be passed to the command line using the specified parameter. Each row in the file will be composed of the File name, Sample name, and its associated attributes in that project (Figure 9). When When running the command on All samples, the text file will have all sample files as rows. When When running the command as Each sample then there will be one info file per command and it will only contain the rows for the files in that sample.
| Numbered figure captions | ||||
|---|---|---|---|---|
| ||||
|

...
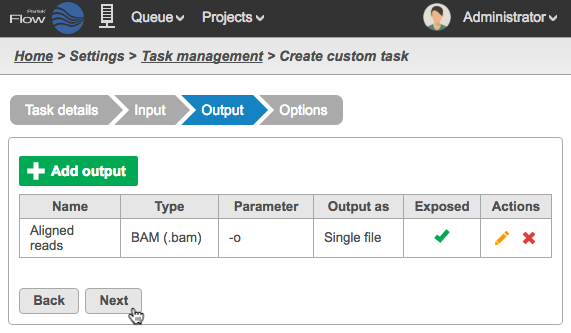
- Type - choose the type of data produced by the task from the drop-down list. The set of output types is restricted to those currently supported by downstream Partek Flow tasks: Unaligned reads, Aligned reads, Assembled reads, or Variants. If you want to output a data type that is not part of this set, select Custom and this will produce an output that can be downloaded
- Name - enter a name for the output data node (this will be the data node that will display in the Analyses tab)
- Exposed - if checked, this output will be exposed as a node on the Analyses tab, otherwise this task will not produce a data node and the output will be accessible through the task result page
Ouput files as - (for Custom types) choose choose between a Single file outputfile output, All All files with prefix, and and a list of files in a Directorya Directory
- Output prefix - to restrict only output files with the given prefix
Output to - placement of output on the command line, which can be: Last Option, Parameter, Standard Out
Output parameter - parameter to place on the command line before this output
After configuring the dialog, click Save. The Output will appear in the Table (Figure 12). Any Any existing output can be edited or deleted
using the action buttons on the far right of the table.
| Numbered figure captions | ||||
|---|---|---|---|---|
| ||||
|
...
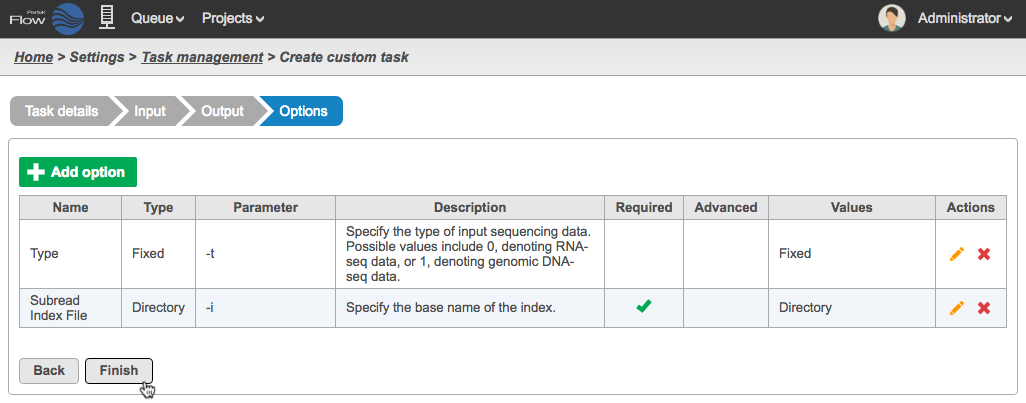
- Name - a label that concisely describes the option, keeping this short ensures that the option label is well displayed and easy to find
Type - the type of value this option can assume, which determines the interface used to choose the value during task setup
Number - spinner component to select number values
- Yes/No - check box to select boolean values
- List - select one or more item from a list of string values
- Text - input box to select arbitrary string values
- Fixed - input box to select a fixed string value (will not show up on the configuration UI of the user task)
- File - file selector for a single file
- Directory - file selector for a directory
- Library file - selector for supported, built in library files (e.g. reference fasta, reference VCF)
Parameter - the parameter used to identify this option on the command line. For example: -a [value], where '-a' is the parameter
- Description - additional information about the option will be available in an 'info' icon (tooltip) when configuring the option
- Advanced - options that are set to advanced will be moved to the advanced options dialog, and can be saved to option sets
- Required - options that are set to required must be filled with a value when configured, otherwise the option is something that can be left off the command line
- Only Integers - if checked, this option will not allow fractional numbers, such as 74.42
- Values range - enter two values to define a range of values
- Default value - enter a default value
- Allow multiple - if checked, allows one or more of the list items to be selected
- Add Value - (for List types) enter one or more strings
- Library type - (for Library file types) can be a Reference sequence or Variant database
After configuring the dialog field, click Save. The Option will appear in the Table as in Figure 15. Any Any existing option can be edited or deleted
using the action buttons on the far right of the table.
Complete the addition of the User added task by clicking the Finish button from the Options step.
| Numbered figure captions | ||||
|---|---|---|---|---|
| ||||
|
Management
The new task will show up as an entry in the Task management table (Figure 16).
| Numbered figure captions | ||||
|---|---|---|---|---|
| ||||
|
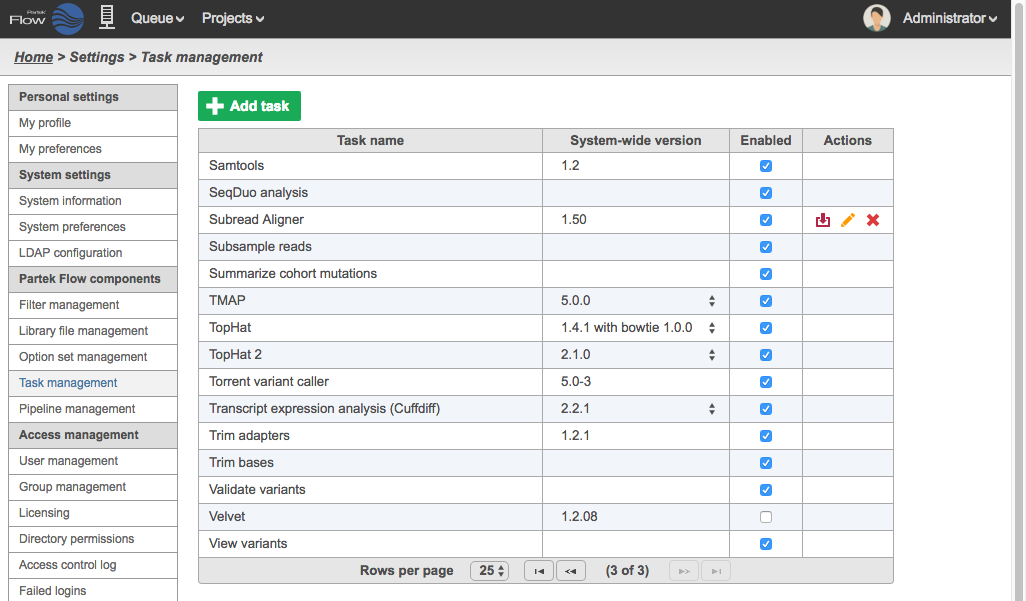
Like native Partek Flow tasks this task can have its system wide version set, and can be globally enabled or disabled. Unlike native Partek Flow tasks, there are additional actions that can be taken on user added tasks:
- Download: Downloads the task definition as a file that can be imported into other Partek Flow installations.
- Edit: Opens the add task wizard with all fields pre-filled. This is a clone operation, so a new task name or version must be selected.
- Delete: Removes the task
Running a Task
User added tasks appear in the context sensitive Task Menu when a selected data node matches the Input data type (Figure 17).
...
Overview
Content Tools