Page History
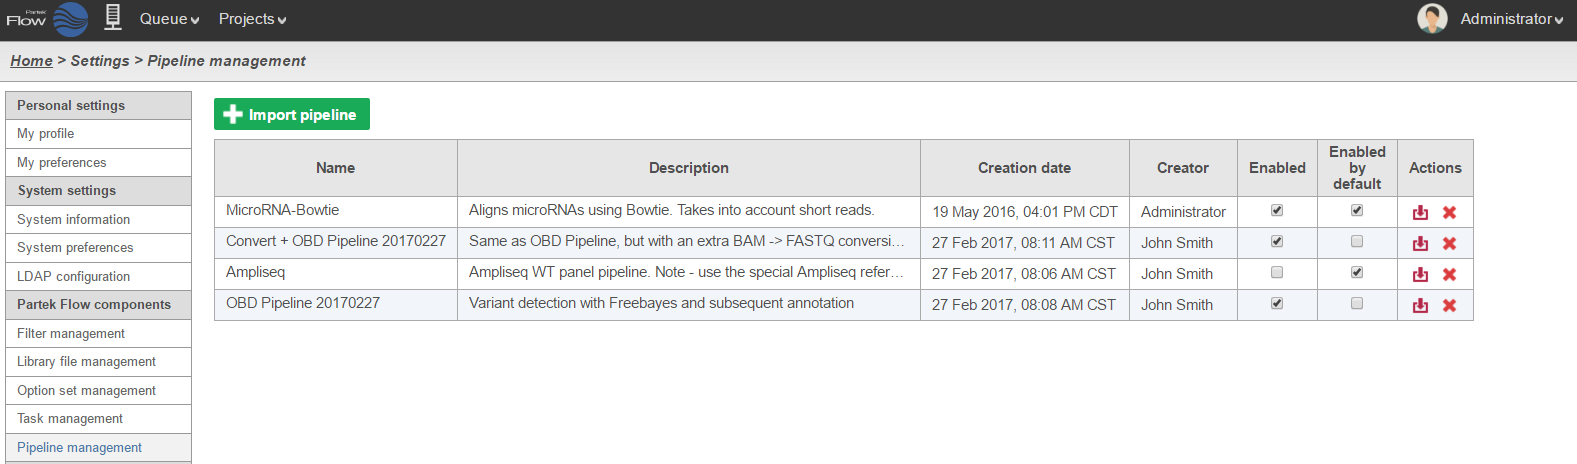
The Pipeline Management page allows users to import, delete, or hide pipelines for each user summaries and manages pipelines within Partek® Flow®. To access the the page, click on the avatar in the top right corner and choose Settings. Then click Pipeline Management on the left (Figure 1). The table shows a list of pipelines with their description and creation date, and the display name of the user who created or imported the pipeline.
| Numbered figure captions | ||||
|---|---|---|---|---|
| ||||
| |
|
Importing a Pipeline
You can upload your own pipeline from your local computer or download a pre-built pipeline directly from the Partek website.
...
- To import a .pipeline file from your local machine, click on the green Import pipeline (Figure 1)
- By default, the My computer radio button at the top of the Import pipeline page should already be selected. Click the Choose file button (Figure 2)
- Browse to the location of the .pipeline file on your local machine and select it for upload. The selected file name will be displayed next to the Choose pipeline button
- If you wish to give the pipeline a new name, type a new name into the Rename pipeline box and click Import
| Numbered figure captions | ||||
|---|---|---|---|---|
| ||||
From Partek Website
- To download a pipeline from the Partek website, click on the green Import pipeline (Figure 1)
Select the Partek website radio button at the top of the Import pipeline page (Figure 3). This will display all available pre-built pipelines from the Partek website.
Figure 2. Pre-built pipelines that can be imported from the Partek website. To preview a pipeline to see more detail, click the pipeline image- Click the Import pipeline button next to the pipeline you wish to import. Alternatively, click Import all pipelines at the bottom of the page to import all pipelines displayed (Figure 2)
You will be redirected back to the Analyses tab. When you select a circular data node, the newly imported pipeline will be available in the Pipelines section in the menu on the right (see Running a Pipeline).
From My Computer
To import a .pipeline file from your local machine into Partek® Flow®:
- Click the Import a pipeline link at the bottom of the screen under the Analyses tab (Figure 1)
- By default, the My computer radio button at the top of the Import pipeline page should already be selected. Click the Choose file button (Figure 3)
- Browse to the location of the .pipeline file on your local machine and select it for upload. The selected file name will be displayed next to the Choose pipeline button (Figure 3)
If you wish to give the pipeline a new name, type a new name into the Rename pipeline box (Figure 3) and click Import.
| Numbered figure captions | ||||
|---|---|---|---|---|
| ||||
- Click the Import pipeline button next to the pipeline you wish to import. Alternatively, click Import all pipelines at the bottom of the page to import all pipelines displayed (Figure 2)
You will be redirected back to the Analyses tab. When you select a circular data node, the newly imported pipeline will be available in the Pipelines section in the menu on the right (see Running a Pipeline).
From My Computer
To import a .pipeline file from your local machine into Partek® Flow®:
- Click the Import a pipeline link at the bottom of the screen under the Analyses tab (Figure 1)
- By default, the My computer radio button at the top of the Import pipeline page should already be selected. Click the Choose file button (Figure 3)
- Browse to the location of the .pipeline file on your local machine and select it for upload. The selected file name will be displayed next to the Choose pipeline button (Figure 3)
If you wish to give the pipeline a new name, type a new name into the Rename pipeline box (Figure 3) and click Import.
Numbered figure captions SubtitleText Importing a pipeline from your local machine AnchorName Importing Pipeline
...
Hiding a Pipeline
Downloading a pipeline
ll be redirected back to the
| Additional assistance |
|---|
|
| Page Turner | ||
|---|---|---|
|
...
Overview
Content Tools