What is Trim tags?
The Trim tags task allows you to process unaligned read data with adaptors, barcodes, and UMIs using a Prep kit file that specifies the configuration of these elements in your NGS reads.
Running Trim tags
- Click an Unaligned reads data node
- Click the Pre-alignment QA/QC section of the toolbox
- Click Trim tags
There are three parameters to configure - Prep kit, Keep untrimmed, and Map feature barcodes.
Selecting Keep untrimmed will generate a separate unaligned reads data node with any reads that do not match the structure specified by the prep kit. This option is off by default, to save on disk space. Selecting Map feature barcodes is only necessary for processing protein data from 10x Genomics' Feature Barcoding assay (v3+ chemistry). For single cell gene expression data, leave this option unchecked.
Partek distributes prep kits for processing several types of data:
- 10x Chromium Single Cell 3' v2
- 10x Chromium Single Cell 3' v3
- 10x Chromium Single Cell 5'
- Drop-seq
- Lexogen QuantSeq FWD-UMI
- Bio-Rad SureCell WTA 3'
- Fluidigm C1 mRNA Seq HT IFC
- Rubicon Genomics ThruPLEX Tag-seq
- 1CellBio inDrop
If your data is from one of these sources, you can select the appropriate option in the Prep kit drop-down menu. If the data is from another source, you can build a custom prep kit file to process your data.
- Choose a Prep kit from the drop-down menu
Click Finish to run Trim tags (Figure 1)
Figure 1. Trim tags task set up
The output of Trim tags is a Trimmed reads data node. An additional Untrimmed reads data node will be generated if the Keep untrimmed option was selected.
The task report provides a table with the total reads, reads retained, % reads retained, reads removed, and % reads removed for each sample (Figure 2). You can click Download at the bottom of the table to save a text file copy to your computer.
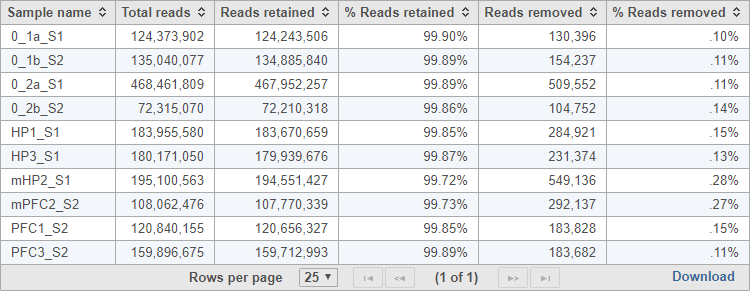 Figure 2. Trim tags task report
Building a custom prep kit
- Select Other / Custom from the Prep kit name drop-down menu
- Give the new prep kit a name
- Choose Build prep kit
You can select Import prep kit if you have a Prep kit .zip file downloaded from Partek Flow.
- Click Create (Figure 3)

Figure 3. Choosing to create a custom prep kit
The Prep kit builder interface will load (Figure 4).
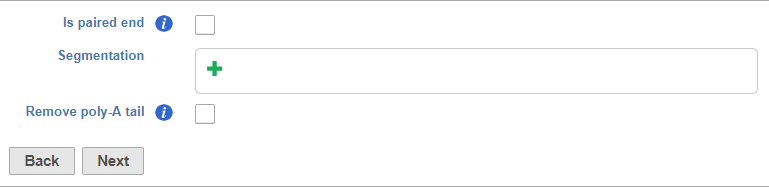
Figure 4. Prep kit builder
There are three sections:
Is paired end - select to switch from single end to paired end FASTQ files (Figure 5). If you choose paired end, the First mate will correspond to the _R1 FASTQ file and the Second mate will correspond to the _R2 FASTQ file.
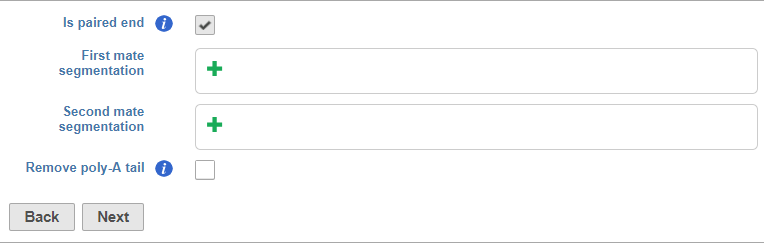
Figure 5. Paired end prep kits have first and second mate segmentation sections
Segmentation - this is where you will describe the structure of your reads
- Click
 to add a segment.
Segments include adaptors, barcodes, UMIs, and the insert (i.e., the target sequence of the assay)
Adaptors
For adaptors, you have the option of choosing a file with your adaptor sequences or entering the adaptor sequences manually.
To use a file, choose File for Sequences and then click Choose File (Figure 6). Use the file browser to choose a FASTA file from your local computer.
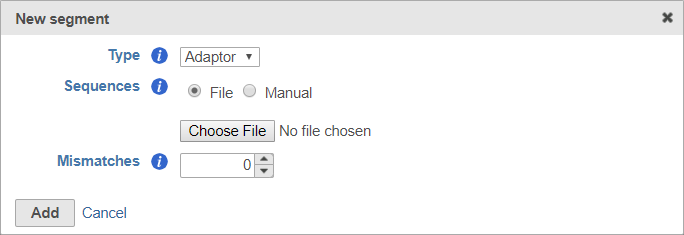 Figure 6. Specifying adaptors with a file
To enter the sequences manually, choose Manual for Sequences then type or paste the adaptor sequences into the text field and click
Figure 6. Specifying adaptors with a file
To enter the sequences manually, choose Manual for Sequences then type or paste the adaptor sequences into the text field and click  to add the adaptor (Figure 7). You must click
  for the adaptor sequence to be included. You can remove any adaptor you have added by clicking
  .
.
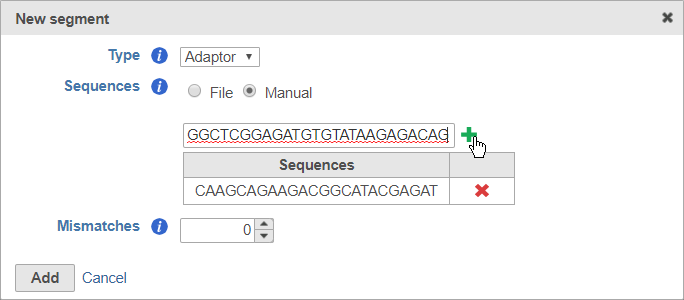
Figure 7. Specifying adaptor sequences manually
You can specify the mismatch allowance using the Mismatches option.
After you have specified the file or manually entered the sequences, click Add to add the adaptor sequence(s).
UMIs
Unique Molecular Identifiers (UMIs) are randomly generated sequences that uniquely identify an original starting molecule after PCR amplification.
Including a UMI in your prep kit will allow you to access a downstream task that uses UMI information for removing PCR duplicates. For more information about the Deduplicate UMIs task, please see our UMI Deduplication in Partek Flow white paper. Note that while the UMI sequence will be trimmed, a record of the UMI sequence for each read is retained for use by this downstream task.
When adding a UMI segment to your prep kit, you can specify the length of your UMIs (Figure 8).
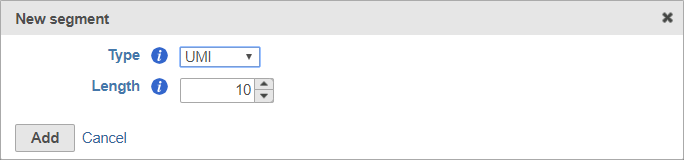
Figure 8. Adding a UMI segment
Barcode
Adding a barcode segment to a prep kit allows you to access downstream tasks that use barcode information, including Filter barcodes and Quantify barcodes to annotation model (Partek E/M). While the barcode sequence will be trimmed, a record of the barcode sequence for each read is retained for use by downstream tasks.
Like adaptors, barcodes can be specified using a file or manually specified, but you can also choose to designate any segment of arbitrary length in the sequence as the barcode. This is useful if you do not have a specific set of known barcodes.
To set the barcode to an arbitrary segment of fixed length, choose Arbitrary and specify the barcode length (Figure 9).
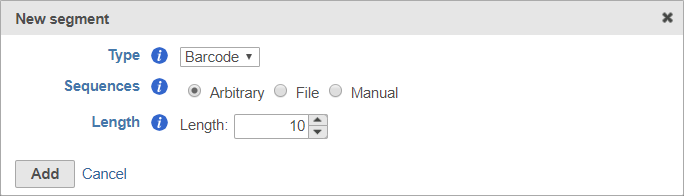
Figure 9. Specifying a barcode with arbitrary sequence
Remember to click Add to add the new segment to your prep kit.
Insert
The insert is the sequence retained after trimming in the Trimmed reads data node. For example, in RNA-Seq, this would be the mRNA sequence. Every prep kit must include an insert segment. You can specify the minimum size of the insert section using the Length field (Figure 10). Reads shorter than the minimum length will be discarded.
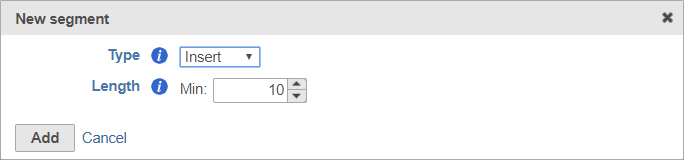 Figure 10. Adding an insert section
Remember to click Add to add the new segment to your prep kit.
Figure 10. Adding an insert section
Remember to click Add to add the new segment to your prep kit.
Ordering segments
Segments are placed from 5' to 3' in the read in the order they are added. You should add the 5' segment first and add additional elements in order of their position in the read. Segments will appear in the Segmentation sections as they are added. You can mouse over a segment to view its details (Figure 11).
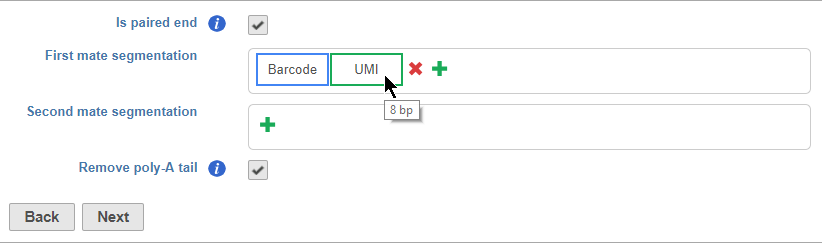
Figure 11. Building a prep kit by adding segments
Custom prep kit example
For example, the expected read structure (Figure 12) and a completed prep kit for a standard Drop-seq library prep are shown below (Figure 13).
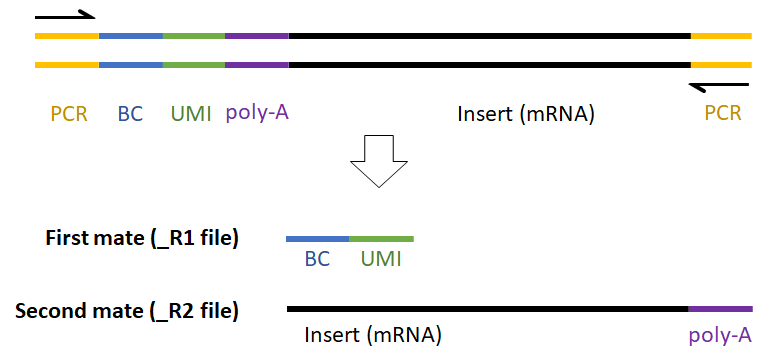
Figure 12. Drop-seq read structure
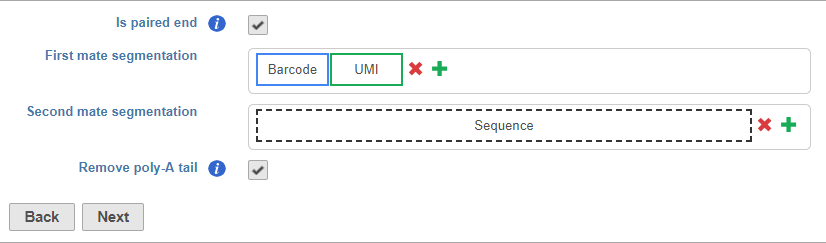
Figure 13. Drop-seq prep kit
Remove poly-A tail - choose this option to trim poly-A tails from the ends of the read with your insert sequence
- Click Next to complete your prep kit
Managing prep kits
You can manage saved prep kits by going to Home > Settings > Library file management and opening the Prep kit files tab (Figure 14).

Figure 14. Prep kit file management
You can add new prep kits from this page by clicking  .
.
You can preview a prep kit by clicking  , delete a prep kit by clicking
  , and download a prep kit to your computer by clicking
  .
.
Prep kits download as a .zip file. This Prep kit .zip file can be imported into Partek Flow by selecting Import from a file when adding a new prep kit. Select the .zip file when importing, do not unzip the file.
Additional Assistance
If you need additional assistance, please visit our support page to submit a help ticket or find phone numbers for regional support.


| Your Rating: |
|
Results: |

|
31 | rates |
Overview
Content Tools