The results of differential gene expression analyses (GSA or ANOVA) in Partek Flow can be filtered to extract meaningful results, e.g. statistically significant genes. User-defined filters can be saved and applied to other projects.
This user guide will cover the following topics:
Saving a Custom Filter
On a Feature list task report, specify the criteria to filter the table of statistical results using the Filter dialog (Figure 1) and click the Save filter button.
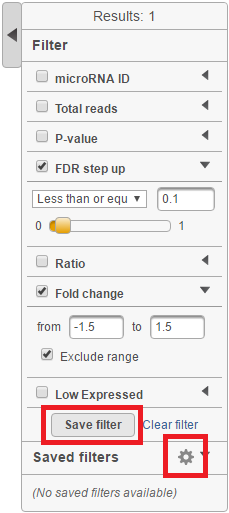
Figure 1. Filter dialog showing filtering criteria (false discovery rate (FDR) step up ≤ 0.1 & Fold change <-1.5 or >1.5) and indicating no filters have been saved yet. The Save filter button is at the bottom of the dialog. The gear icon opens the Filter management page
Name the filter by typing into the Filter name box in the Save filter dialog and click the Save filter button (Figure 2).
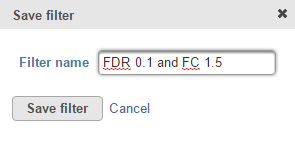
Figure 2. Give the filter a name and save
Saved filters will appear in the Saved filters section in the Filter dialog (Figure 3). Saved filters are only available to the Partek Flow user that created them. They will not be available to other administrative or nonadministrative users on the same Partek Flow instance.
To apply a saved filter to a table of statistical results, click the filter name in the saved filters section in the Filter dialog. If a filter is applied to a table, the filter name will appear at the top of the Filter dialog.
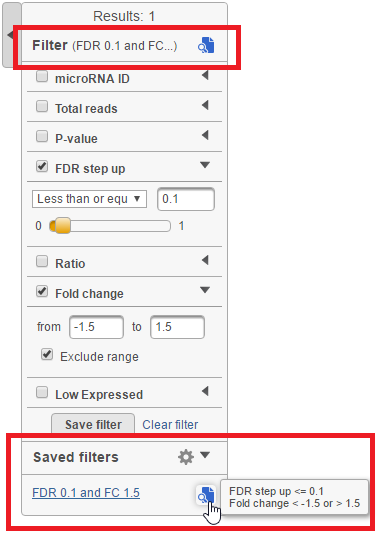
Figure 3. Saved filters are available at the bottom of the Filter dialog to all the users of the same Partek Flow.
Hovering over the Preview filter (![]() ) icon in the Filter dialog will show a full description of the filter in a pop-out balloon. Applied filters are displayed at the top of the Filter dialog
) icon in the Filter dialog will show a full description of the filter in a pop-out balloon. Applied filters are displayed at the top of the Filter dialog
Filter Management Page
To access the Filter management page, click on the gear (![]() ) icon in the Filter dialog on a Feature list task report (Figure 1, above). Alternatively, click the avatar in the top right corner, choose Settings and click Filter management on the left (Figure 4). This page can be accessed by administrative and nonadministrative Partek Flow users. The table on the Filter management page displays all saved filters created by the Partek Flow user that is currently logged in (Figure 4). Filters created by other Partek Flow users will not be displayed in the table.
) icon in the Filter dialog on a Feature list task report (Figure 1, above). Alternatively, click the avatar in the top right corner, choose Settings and click Filter management on the left (Figure 4). This page can be accessed by administrative and nonadministrative Partek Flow users. The table on the Filter management page displays all saved filters created by the Partek Flow user that is currently logged in (Figure 4). Filters created by other Partek Flow users will not be displayed in the table.
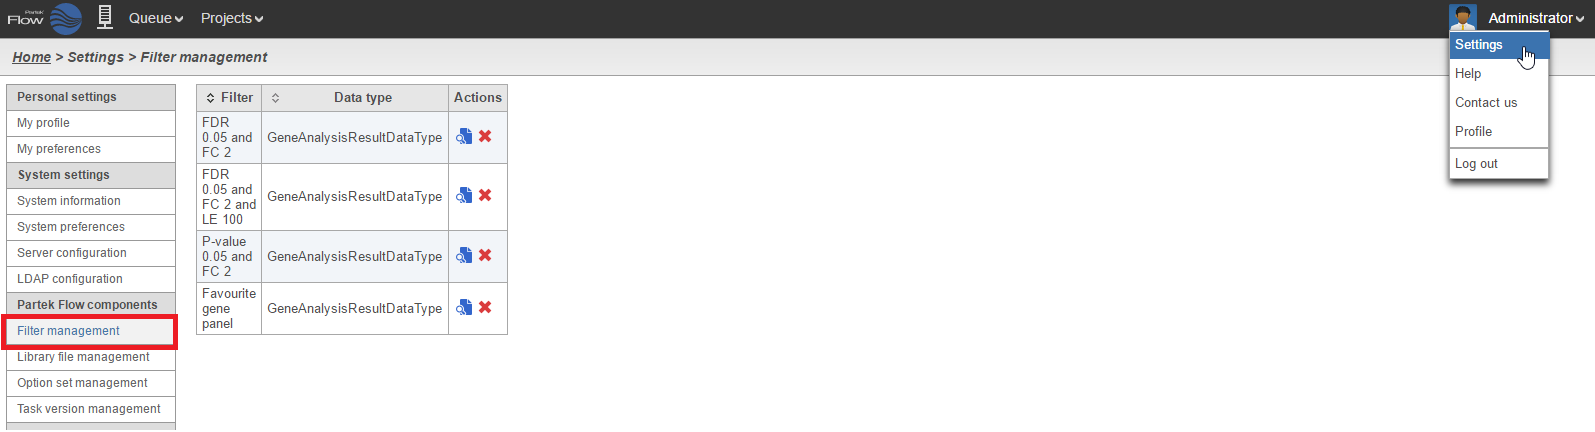
Figure 4. The Filter management page
Hover over the Preview filter (![]() ) icon in the Actions column to show a full description of the filter in a pop-out balloon (Figure 4). Click the Preview filter (
) icon in the Actions column to show a full description of the filter in a pop-out balloon (Figure 4). Click the Preview filter (![]() ) icon to show the filter details in a table (Figure 5). To delete a filter, click the red cross (
) icon to show the filter details in a table (Figure 5). To delete a filter, click the red cross (![]() ) icon in the Actions column on the filter management page (Figure 4).
) icon in the Actions column on the filter management page (Figure 4).
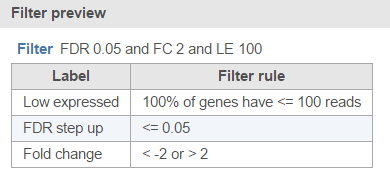
Figure 5. Preview filter in a table
Additional Assistance
If you need additional assistance, please visit our support page to submit a help ticket or find phone numbers for regional support.


| Your Rating: |
|
Results: |

|
34 | rates |
Overview
Content Tools
1 Comment
Melissa del Rosario
author: spatel