The Peak calling task is used to detect enriched genomic regions on reads generated from ChIP-seq, DNase-seq, MeDIP-seq etc. experiments. Partek® Flow® provides the widely used method of MACS2-model-based analysis1 (http://liulab.dfci.harvard.edu/MACS/) to find peaks. It can be performed with or without control sample.
Selecting MACS2 from the context sensitive menu will bring up the MACS2 task dialog. The interface will appear differently depending on the input aligned data node and whether there are sample attributes available in the Data tab.
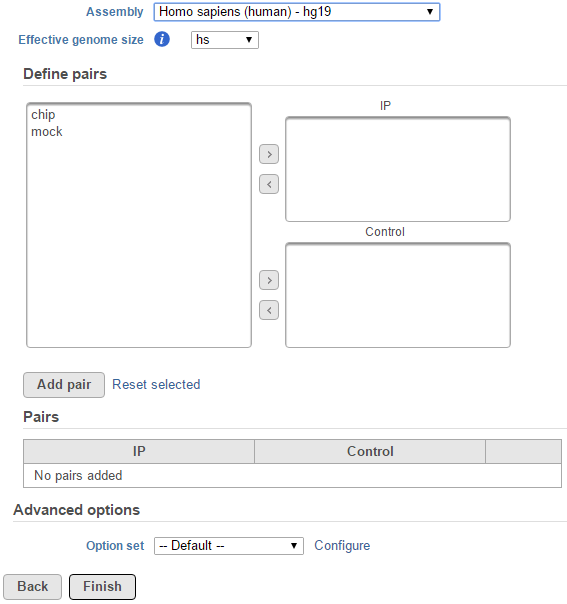
If the selected aligned data node was imported, the reference assembly used during data alignment needs to be specified. Choose the Assembly from the drop-down list within the MACS2 dialogue (Figure 1). If the selected aligned data node was generated by Partek Flow, this option will not appear.
|
The Effective genome size is the genome size of the regions that can be sequenced. Because of the repetitive features on the chromosomes, the actual mappable genome size will be smaller than the original size, typically about 70%-90% of the genome size. There are presets of 4 species based on MACS2 recommendation1 for this parameter:
When Other... is selected, a specific value of the effective genome size needs to be specified with bps as unit (Figure 2).
|
For data where no sample attributes were specified, the peak detection pairs needs to be manually defined. In the example in Figure 1, there only two samples. For the Define pairs section, the left panel lists all the sample names (chip and mock) . Add one pair at a time by selecting the chip sample to put in the IP panel on the top-right, and selecting the mock sample in the Control panel on the bottom-right.
If there is no control sample in the experiment, the Control panel can be blank. If more than one ChIP or Control samples are added, the samples will be combined (or pooled) in the analysis.
For data where the sample attributes are defined (Figure 3), you will have an additional option to add pairing or grouping based on the attributes. Figure 3 shows an example data with 4 samples, 2 time points, and there is one IP sample and one Input sample in each time point.
|
When running the MACS2 task, sample attributes will be used to define the multiple pairs (Figure 4). There is an IP-Input pair for each time point, so the Pair attribute is the Time attribute. The Control attribute is the attribute that differentiates between the Input and IP groups, and in this example, it is the ChIP attribute. Finally, the Control term is labeled as Input in the example.
|
|
In the task report, each pair will generate a list of peaks displayed in a table (Figure 6). Use the drop down menu next to Peaks detected for... to select the pair.
|
Click the browse to peak button (![]() ) to invoke chromosome view and zoom into that location.
) to invoke chromosome view and zoom into that location.
Click the Download button at the lower-right corner to download the peaks in a text file.
|