Page History
...
The table on the User management page displays user account information and status, with one user account per row. By default, the table will display all enabled users accounts that are online and offline. To change which users are displayed, select or deselect the checkboxes above the table (Figure 1).
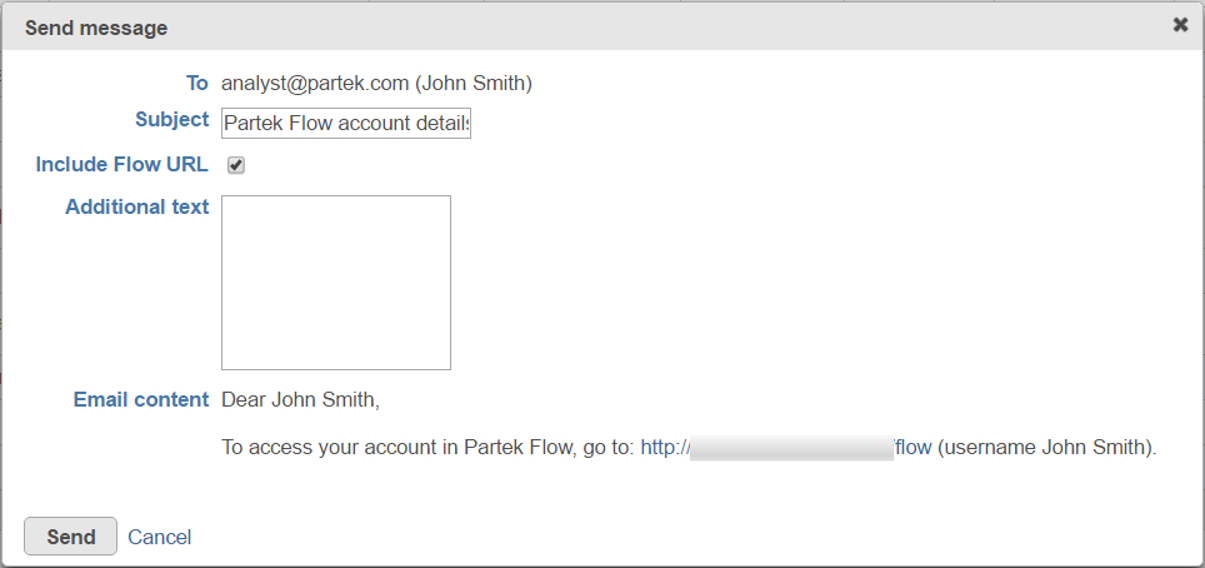
By clicking on the Send message button, the administrative user can send an e-mail notification about account creation. The dialog depends on the user database; an e-mail to a user who is not within an LDAP database (vide infra) is shown in Figure 2, while an e-mail to a user who is within an LDAP can be seen in Figure 3.
| Numbered figure captions | ||||
|---|---|---|---|---|
| ||||
|
| Numbered figure captions | ||||
|---|---|---|---|---|
| ||||
|

If multiple Partek Flow users are logged into an instance at the same time, administrative users have the ability to log them out by clicking the Log out user icon (![]() ) (Figure 1). If a user is logged out by an administrator and the user has tasks running or in the queue, those tasks will continue to run.
) (Figure 1). If a user is logged out by an administrator and the user has tasks running or in the queue, those tasks will continue to run.
...
- Click the green Add new user icon (
) at the top of the User management page
- Select the Source is … checkbox in the Add user dialog (Figure 24)
- Start typing a few characters of the username you wish to add in the Username box and Partek Flow will suggest users that are available on your LDAP database. Select one of the suggested usernames and the Username, Display Name and Email will autocomplete. You can change the Display name if necessary
- There may be more than one email address associated with a user in the LDAP database, so choose the correct one from the Email drop-down list
- To give the new user account administrative privileges, select the Administrator checkbox (optional)
- The new user account can also have a Private directory. If so, then that directory will be the default output directory for the users and all the project directories will be created underneath it. The user will be the only one with the access to the directory specified in the dialog box, unless permissions (to either the Private directory or one if its parents) are given using Directory permisions.
- To set a disk space usage limit on the new user account, select the Disk quota radio button and type in the disk quota limit in GB (optional). This limit includes input and output files across all projects the new user will own. To allow unrestricted disk usage, select the None radio button. Disk quota preferences can be managed on the System preferences page. Note that setting disk quotas require an enterprise license
- Click Save
...
- Click the green Add new user icon (
- Deselect the Source is …checkbox in the Add user dialog (Figure 24)
- Type a username, display name and email address in the respective fields
- To give the new user account administrative privileges, select the Administrator checkbox (optional)
- To set a disk space usage limit on the new user account, select the Disk quota radio button and type in the disk quota limit in GB (optional). This limit includes input and output files across all projects the new user owns. To allow unrestricted disk usage, select the None radio button. Disk quota preferences can be managed on the System preferences page. Note that setting disk quotas require an enterprise license
- Click Save
The screen will return to the User management page and there will be a message at the top of the screen (Figure 35). The new user needs to click on the link sent via email and follow the on-screen instructions for creating a password.
...
To disable a user account, deselect the checkbox in the Enabled column in the table on the User management page (Figure 46). The user account will then disappear from the table. If a user account if disabled while the user is logged in, they will immediately be logged out.
...
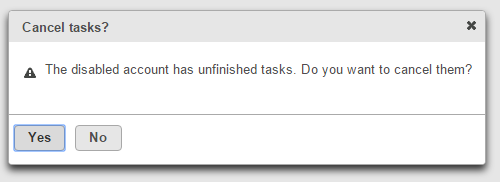
If a user account is disabled and they have tasks running or in the queue, you will be asked if you want to cancel them (Figure 57).
| Numbered figure captions | ||||
|---|---|---|---|---|
| ||||
|
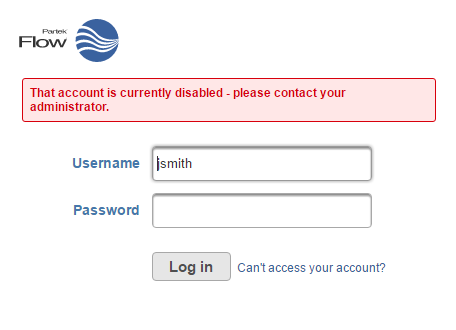
If a user tries to log into the Partek Flow instance and their account has been disabled, they will see a warning message (Figure 68).
| Numbered figure captions | ||||
|---|---|---|---|---|
| ||||
|
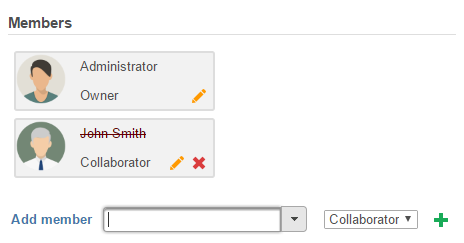
Users that have had their account disabled will no longer appear as a member of a project on the Home page. Under the Project settings tab of a project, their username and avatar will still be shown, but with a strikethrough (Figure 79).
| Numbered figure captions | ||||
|---|---|---|---|---|
| ||||
|
To display disabled user accounts, select the Disabled check box above the table (Figure 810). Disabled accounts can be easily re-enabled by selecting the check box in the Enabled column (Figure 8).
...
Overview
Content Tools