Page History
...
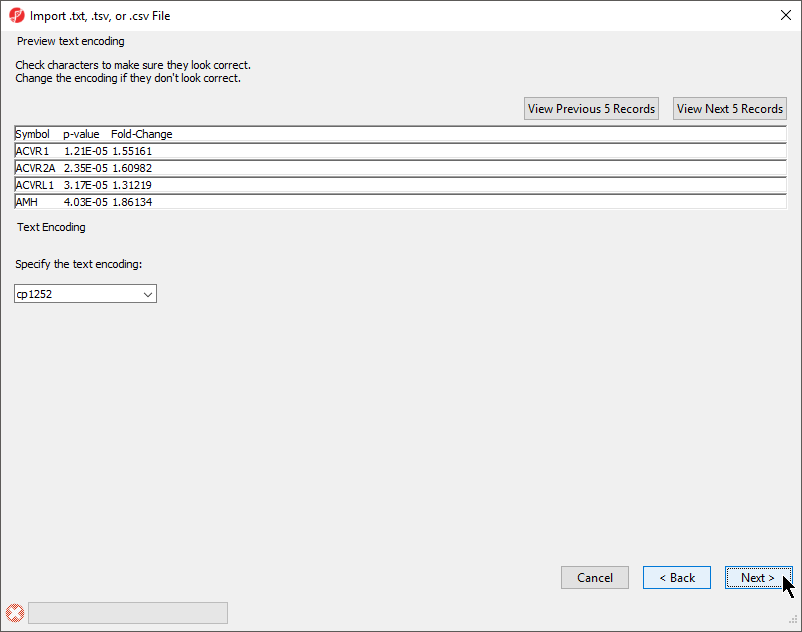
- If the text does not appear properly, use the Specify the text encoding: drop-down menu to choose the correct encoding
| Numbered figure captions | ||||
|---|---|---|---|---|
| ||||
|
...
There are many useful visualizations, annotations, and biological interpretations that can operate on
a gene list. In order for these features operate on an imported list, an annotation file must first be
associated with the gene-list. Additionally, many operations that work with a list of significant genes
(like GO- or Pathway-Enrichment) require comparison against a background of “non-significant”
genes.
Adding an annotation file
The quickest way to accomplish both is to use the background of “all genes” for that organism
provided by an annotation source like RefSeq, Ensembl, etc. in .pannot (Partek® annotation), .gff, .gtf,
.bed, tab- or comma-delimited format. If the file is not already in a tab-separated or comma delimited
format, you may import, modify, and save the file in the proper file format.
...
In addition to SNPs, this feature can associate any data with a list of genes or genomic coordinates; the dbSNP database, any miRNA database, data from the Database of Genomic Variants (dgv), any mRNA transcriptome database, or any custom annotation source can be associated with your list. In each case, this feature will add columns to the imported gene list spreadsheet that correlate match the genes with the features from those databases.
...
Like GO Enrichment, Pathway Enrichment does not require numerical values, but instead operates on lists of genes - a list of significant genes vs. background genes. Consequently, Pathway Enrichment may be used with an imported list of genes. The list of background genes is set to the species transcriptome by default, but can be set to a specific set of genes if the gene list has been associated with an annotation file.
...
- Select Tools from the main command toolbar
- Select Annotate SNVs
Starting with a
...
list of genomic regions
Importing a region list
A region list in PGS must contain the chromosome, start location, and stop locations as the first three columns, respectively. The chromosome name (or number) in the region list must be compatible with the genomic annotation for the species if you plan to use any feature (like motif detection) that requires reference sequence information.
- Import the region list as described above for text files. Select Other for data type. Chromosome name or number should be imported as a text field; location start and stop may be either integer or text.
- Right-click on the imported spreadsheet in the spreadsheet tree
- Select Properties
- Select List of genomic regions from the Configure Spreadsheet dialog
- Select region in the Add Property drop-down menu and select Add
The spreadsheet properties will now include region. If you would like to do any operation that requires looking up hte reference genomic sequence information for the regions based on genomic location, you will need to specify the species for this region list.
- Right-click on the imported spreadsheet in the spreadsheet tree
- Select Properties
- Select Genomic from the Add Property drop-down menu
- Select Add
- Select your options from the Species and Genome Guild drop down menus
- Select OK
With a few additional options, the region list can be made viewable in the genome browser.
- Right-click on the imported spreadsheet in the spreadsheet tree
- Select Properties
- Select Advanced..
- Select Edit next to the species name
- Specify the Cytoband file and 2Bit sequence file
- Select OK
Motif detection
Starting with a region list, you may detect either known or de novo motifs using the ChIP-Seq
workflow if your spreadsheet has been associated with a species and a reference genome as
described in the import section.
Set Workflows to ChIP-Seq
In the Peak Analysis section of the workflow, select Motif detection. Both options
(Discover de novo motifs and Search for known motifs) can now be performed
Motifs (de novo) may be displayed in the Genome Browser and known detected motifs may be
viewed in web-log format by right-clicking on a header row of the motif spreadsheet.
| additional-assistance |
|---|
|
| Rate Macro | ||
|---|---|---|
|
Overview
Content Tools