Page History
The Partek® Flow® Uploader Partek Flow Uploader is a Torrent Browser plugin that lets users easily upload run results into their to Partek Flow server for further analysis.
For quick video on how to run the plugin, you can go directly here.
This guide is for Partek® Flow® Uploader v.1.02 and covers the following:
| Table of Contents | ||||||
|---|---|---|---|---|---|---|
|
Quick Video Tutorial on running the Plugin
| Multimedia | ||||||
|---|---|---|---|---|---|---|
|
The clip below above (video only, no audio) shows the Partek Flow Uploader plugin in action.
| Multimedia | ||||||
|---|---|---|---|---|---|---|
|
Downloading the Plugin
Download the Partek® Flow® Uploader from the link links below:
https://customer.partek.com/plugins/PFU/PartekFlowUploader-1.0203.zip
This is a compressed zipped file. Do not unzip.
...
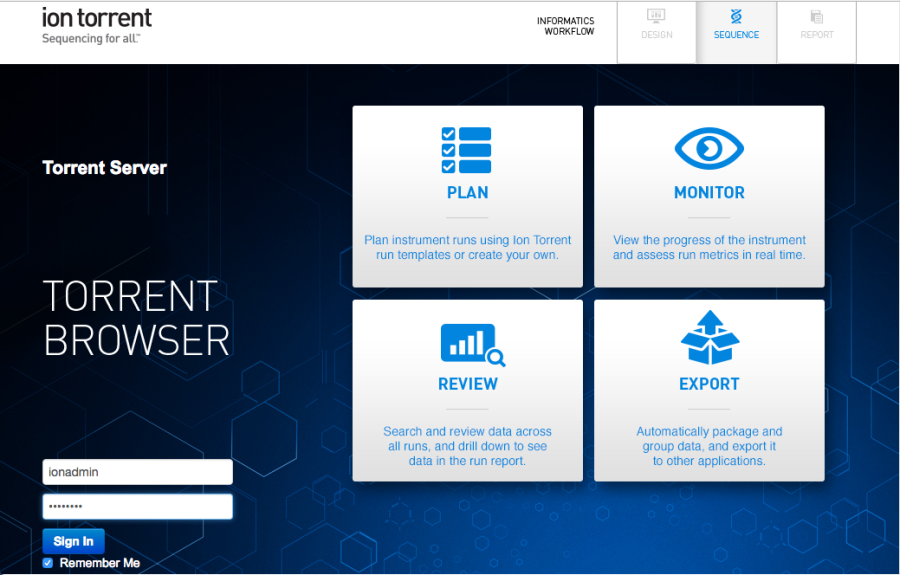
To install the plugin, first log into Torrent Browser (Figure 1).
| Numbered figure captions | ||||
|---|---|---|---|---|
| ||||
|
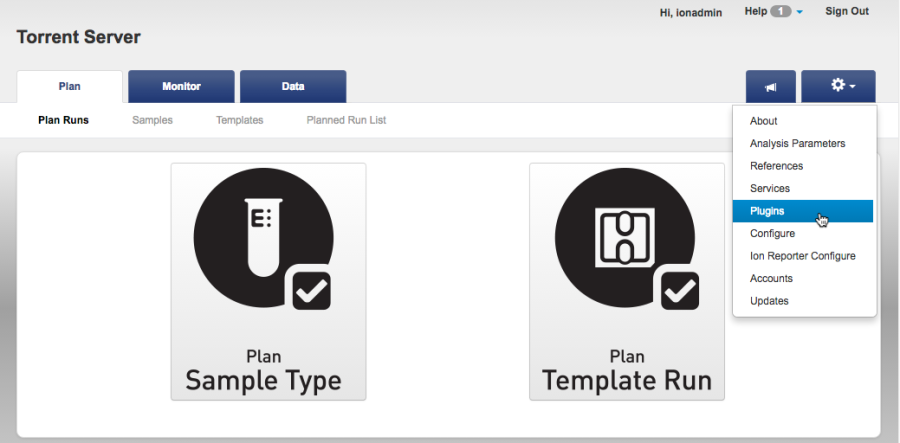
Navigate to Plugins under dropdown menu in upper-right corner under the gear icon (Figure 2).
| Numbered figure captions | ||||
|---|---|---|---|---|
| ||||
|
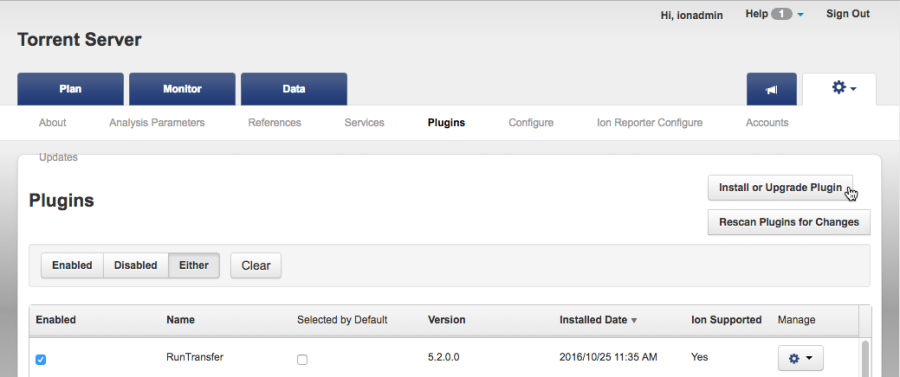
Click the button the Install or Upgrade Plugin button (Figure 3).
| Numbered figure captions | ||||
|---|---|---|---|---|
| ||||
|
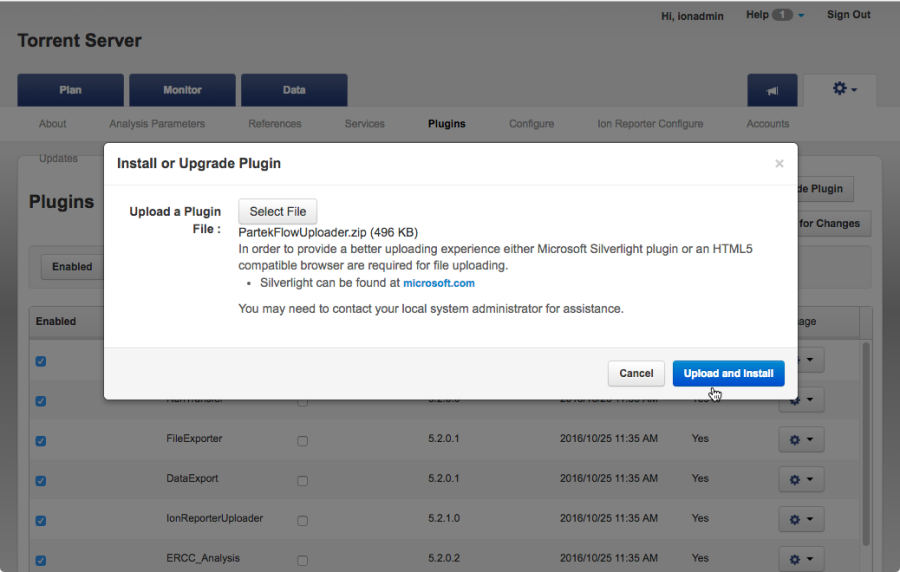
Click Select File (Figure 4) and use the file browser to select the zip file you downloaded from the download link. Click Upload and Install.
| Numbered figure captions | ||||
|---|---|---|---|---|
| ||||
|
Verify that the Partek Flow Uploader is listed and that the Enabled checkbox is selected (Figure 5).
| Numbered figure captions | ||||
|---|---|---|---|---|
| ||||
|
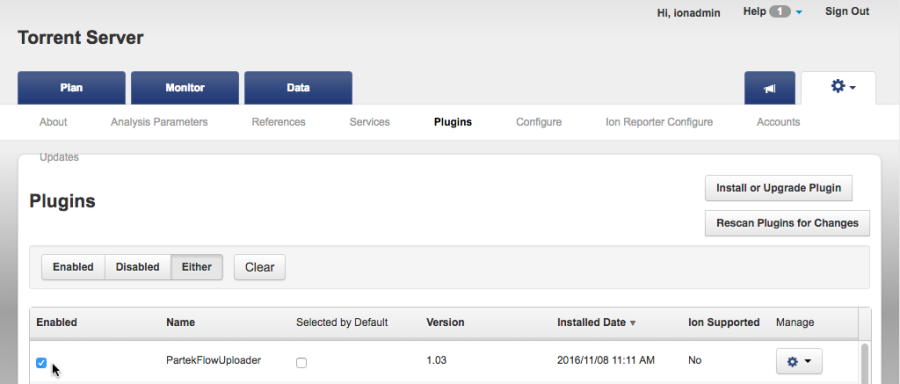
Figure 5:
From the plugins table, click the (Manage) gear icon for the Partek Flow Uploader and select Configure in the drop-down menu (Figure 6).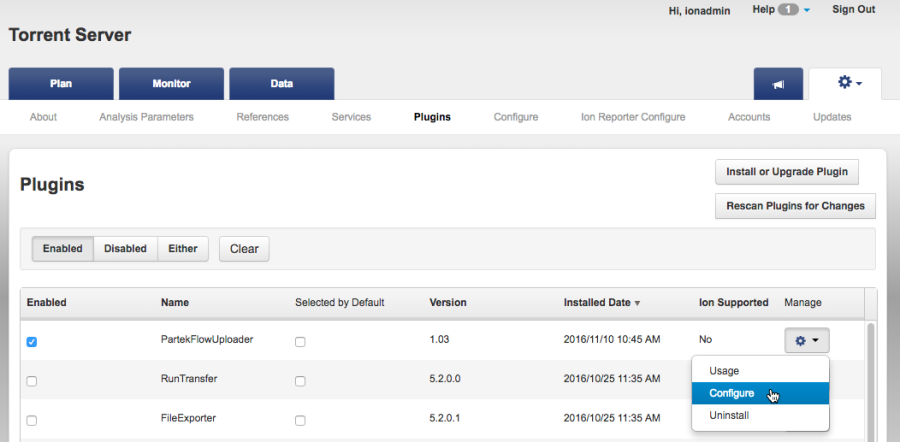
Figure 6:
| Numbered figure captions | ||
|---|---|---|
|
...
| |||
|
Global Partek Flow configuration settings can be entered into the plugin. When set, it will serve as the default for all users of the Torrent Browser. If multiple Partek Flow users are expected to run the plugin, it is recommended to leave the username and password fields blank so that individual users can enter them as needed.
In the configuration dialog (Figure 7), enter the Partek Flow URL, your username and your password. Clicking on Check configuration would verify your credentials and indicate if a valid username and password has been entered. Click Save when done. 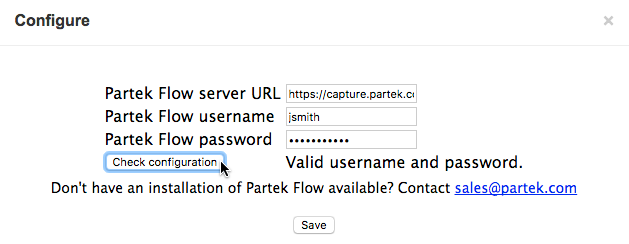
Figure 7: Global Plugin configuration settings
...
| Numbered figure captions | ||||
|---|---|---|---|---|
| ||||
|
Click the Rescan Plugins for Changes button. Rescanning the plugins will finish the installation and save the
...
configuration.
...
Adding the Plugin to your Run Plan
In the Torrent Browser, you can configure a Run Plan to include the Partek Flow Uploader.
...
You can create a new Run Plan (from a Sample or a Template) or edit an existing Run Plan.
...
In the example in Figure 8, the Partek Flow Uploader will be included in an existing Run Plan. From the Planned Runs page, click the gear icon in the last column, and choose Edit. 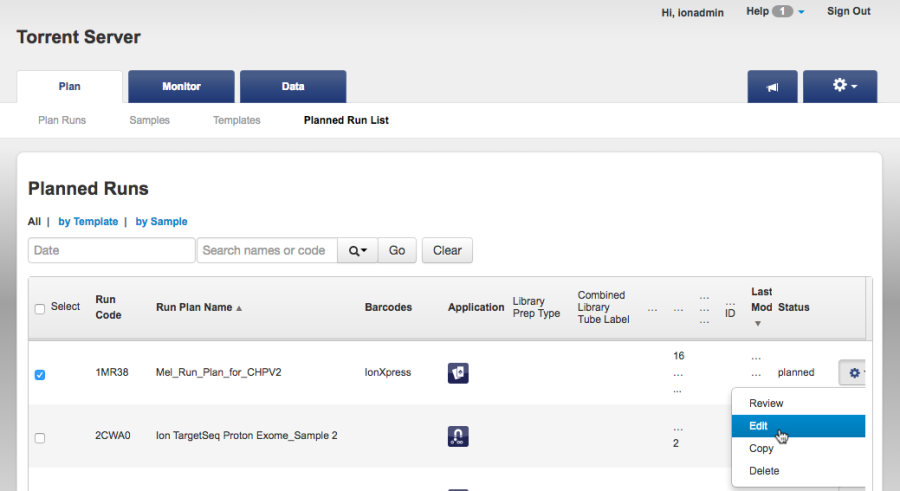
Figure 8:
| Numbered figure captions | ||
|---|---|---|
|
...
| |||
|
In the Edit Plan page, go to the Plugins tab (Figure 9) and select the checkbox next to the PartekFlowUploader.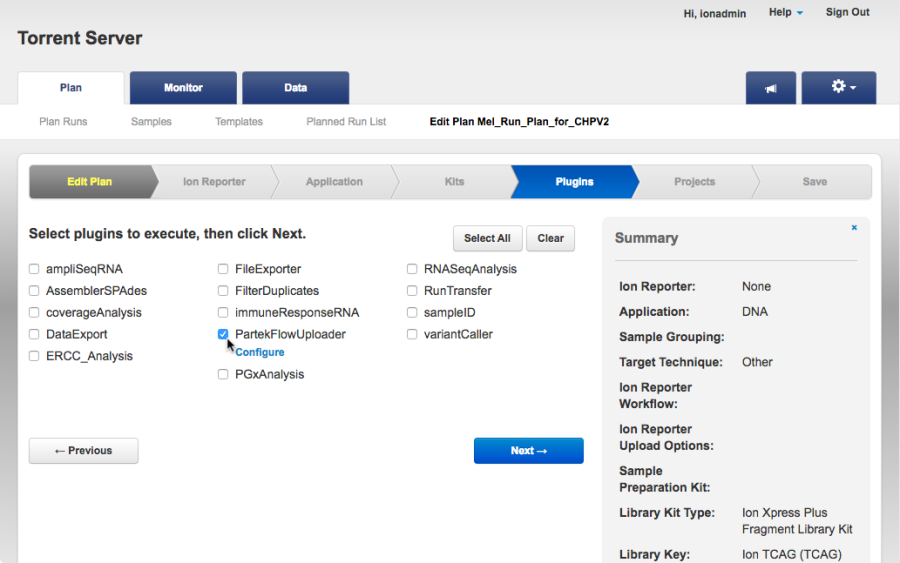
Figure 9:
| Numbered figure captions | ||
|---|---|---|
|
...
| |||
|
Click the Configure hyperlink next to the PartekFlowUploader (Figure 10). If necessary, enter the Partek Flow URL, your username and your password. These are the same credentials you use to access Partek Flow directly on a web browser. Note that some fields may already be pre-populated depending on the global plugin configuration, you can edit the entries as needed. All fields are required to successfully run the plugin.
The Project Name field will be used in Partek Flow to create a new project where the run results will be exported. However, if a project with that name already exists, the samples will be added to that existing project. This enables you to combine multiple runs into one project. Project Names are limited to 30 characters. If not specified, the plugin will use the Run Name as the Project Name.
Click the Check configuration button to see if you typed a valid username and password. When ready, click Save Changes to proceed. 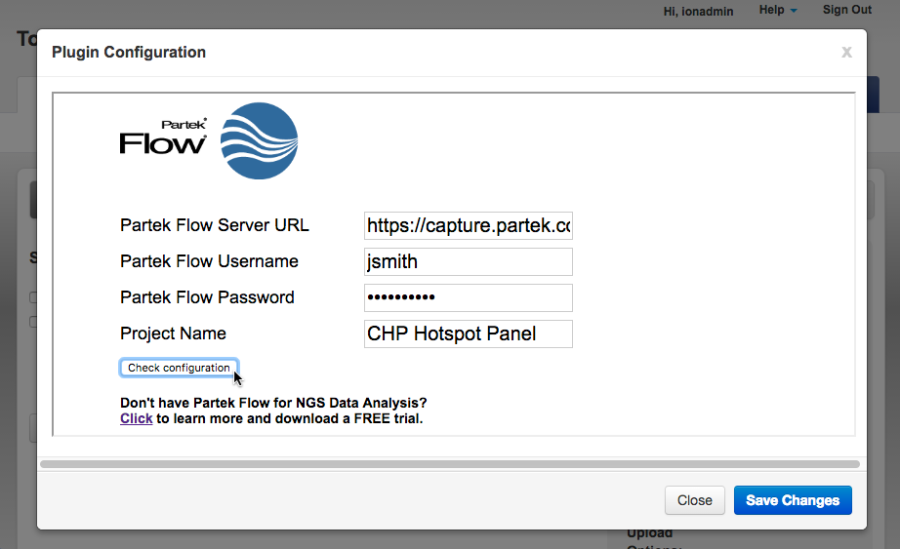 Figure 10:
| Numbered figure captions | ||
|---|---|---|
|
...
| |||
|
Proceed with your Run Plan. The plugin will wait for the base calling to be finished before exporting the data to Partek Flow.
Once the Run Plan is executed, data will be automatically exported to the Partek Flow Server. In the Run Report, go to the Plugin Summary tab and the plugin status will be displayed. An example of a successful Plugin upload is shown
...
in Figure 11.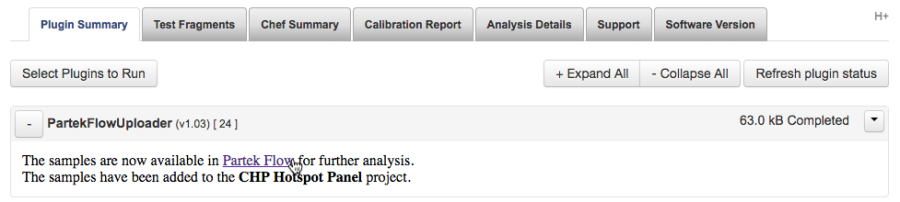
Figure 11:
| Numbered figure captions | ||
|---|---|---|
|
...
| |||
|
To access the project, click on the Partek Flow hyperlink in the plugin results (Figure
...
11). You can also go directly to Partek Flow in a new browser window and access your account. In your Partek Flow homepage (Figure 12), you will now see the project created by the Partek Flow Uploader.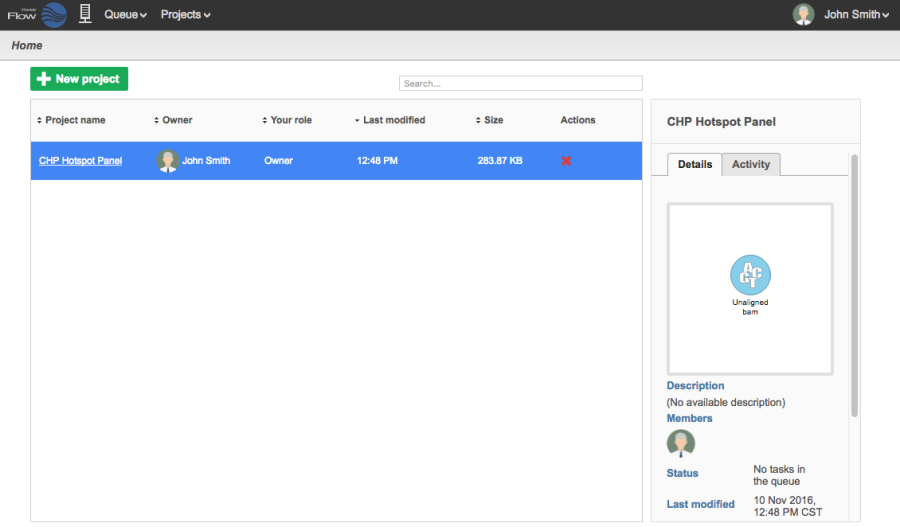
Figure 12:
| Numbered figure captions | ||
|---|---|---|
|
...
...
| ||
|
Running the Plugin from a Report
You can manually invoke the plugin from a completed run report. This allows you to export the data from the Torrent Server if you did not include the plugin in the original run plan. This also gives you the flexibility to export the same run results onto different project(s). Open the run report and scroll down to the bottom of the page (Figure 13). In the Plugin Summary tab, click the Select Plugins to Run button. Figure 13:
| Numbered figure captions | ||
|---|---|---|
|
...
- Select the PartekFlowUploader plugin
...
| |||
|
From the plugin list (Figure 14), select the PartekFlowUploader plugin.
| Numbered figure captions | ||
|---|---|---|
|
...
...
|
...
|

Configure the Partek Flow Uploader from a Report
Enter . Enter the Partek Flow URL, your username and your password (Figure 15). These are the same credentials you use to access Partek Flow directly on a web browser. Although some fields may already be pre-populated depending on the global plugin configuration, you can edit the entries as needed. All fields are required to successfully run the plugin.
| Numbered figure captions | ||||
|---|---|---|---|---|
| ||||
|
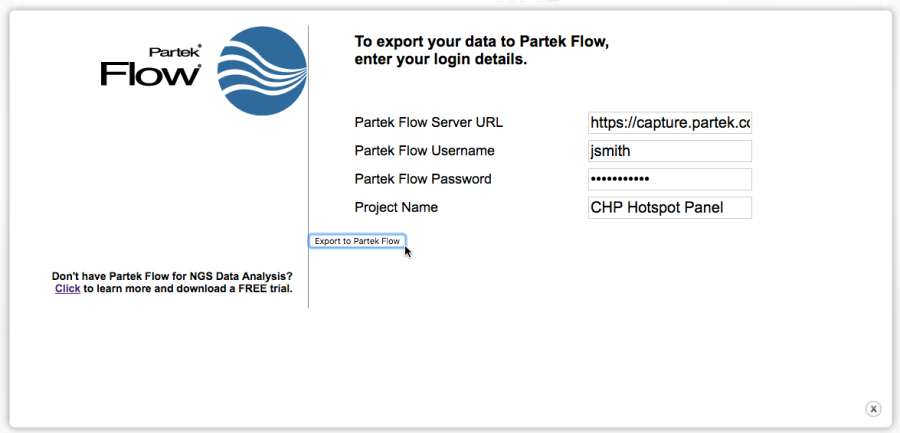
The Project Name field will be used in Partek Flow to create a new project where the run results will be exported. However, if a project with that name already exists, the samples will be added to that existing project. This enables you to combine multiple runs into one project. Project Names are limited to 30 characters. The default project name is the Run Name.
When ready, click Export to Partek Flow to proceed. If you wish to cancel, click on the X on the lower right of the dialog box.
Note that configuring the Plugin from a report (Figure 15) is very similar to configuring it as part of a Run Plan (Figure 10) with two notable differences:
- The Check configuration has been replaced by Export to Partek Flow button, which when clicked, immediately proceeds to the export.
- The Save changes button has been removed so any change in the configuration cannot be saved (compared to editing a run plan where plugin settings are saved)
Once the plugin starts running, it will indicate that it is Queued on the upper right corner of the Plugins Summary (Figure 16). There will also be a blue Stop button to cancel the operation.
Figure 16:
| Numbered figure captions | ||
|---|---|---|
|
...
| |||
|
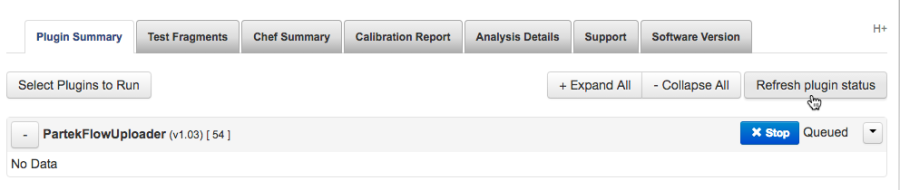
Click the Refresh plugin status button to update. The plugin status will show Completed once the export is done and the data is available in Partek Flow (Figure 11).
...
Sample table created by the Plugin
The Partek Flow Uploader plugin sends the data unaligned bam files to the Partek Flow server. Once transferred, Partek Flow then proceeds to validate the data within a Project.
There may be some occasions when the plugin is already done transferring the data but Partek Flow is still validating it. This can easily be checked by expanding the sample table. To do so, open the project in Partek Flow, select the Data tab, and click the Show data files link on the lower left of the table For each file, a Sample of the same name will be created in the Data tab (Figure 17).
Figure 17: Expanding the Sample Table to display the Data files
If the data is still being validated, the table will have empty cells in the Files column (Figure 18). Refresh the page and make sure the table is complete before proceeding.
Figure 18: Data still being validated and the project is not yet ready
Once data validation is done, the table should be complete (Figure 19).
Figure 19: All files are validated and the project is ready
If the validation fails to succeed, some files will not be imported (cells will remain blank) and there will be a notification in the Log Tab. Refer to the Run Report in the Torrent Browser to check if there was any issue in the run.
The Sample Table in Partek Flow (Figure 19) has corresponding information in the Run Report of the Torrent Browser (Figure 20).
The Sample name in Partek Flow corresponds to the Sample column in the Output files section of the Run Report. The unaligned BAM (UBAM) file for each sample has been transferred to Partek Flow and appears in the bam (Files) column. The Run Name is added as a sample attribute.
For reads that have no barcodes, the Torrent Browser does not assign a sample name (shown as None on the first row of Figure 20). These reads are also transferred to Partek Flow. For clarity, the plugin assigned them to a sample named No barcode (first row in Figure 19).
Figure 20: Torrent Browser run report showing corresponding items in the Partek Flow Sample table in red
To add multiple Runs to the same Partek Flow Project, configure the plugin and use the same Project Name (Figure 10 or Figure 15). The samples will be combined in the same project. Figure 21 shows a Partek Flow Sample table from two Ion Torrent Runs (note the Run Name column).
If two different runs have the same sample names, each would appear as a separate row with names appended (e.g., Sample 1.1).
Figure 21: Partek Flow project containing data from multiple runs. Duplicate samples are appended by a dot followed by a number
Samples you do not wish to include in your analysis (particularly those with no barcodes) can be easily deleted by clicking the gear icon next to the sample name and selecting Delete sample (Figure 22).
Figure 22: Deleting samples in Partek Flow
| Numbered figure captions | ||||
|---|---|---|---|---|
| ||||
|
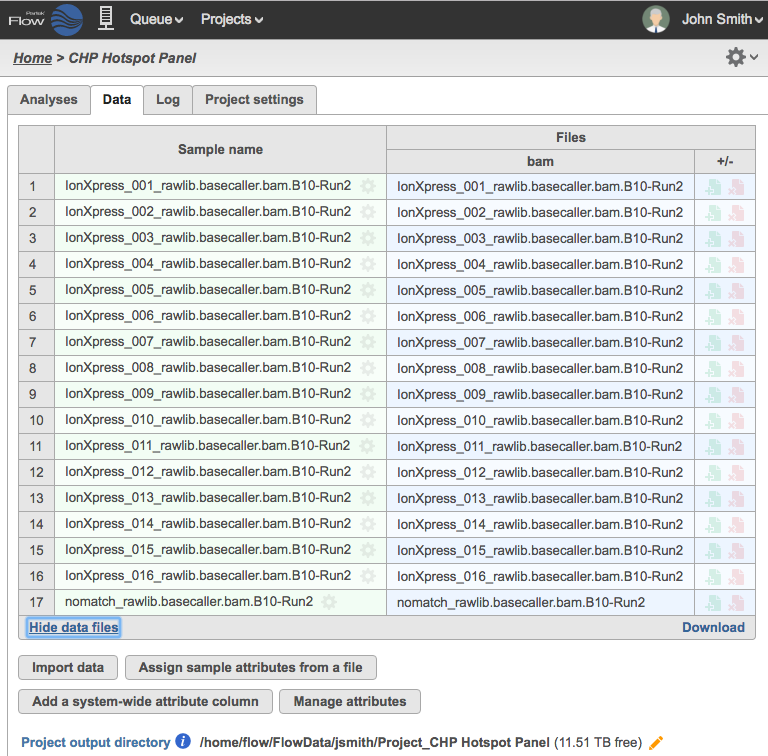
Reads that had no detectable barcodes have been combined in a sample with a prefix: nomatch_rawlib.basecaller.bam (Row 17 in Figure 17). You can removed this sample from your analysis by clicking the gear icon ![]() next to the sample name and choosing Delete sample.
next to the sample name and choosing Delete sample.
...
The data transferred by the Partek Flow Uploader is stored in a directory created for the Project within the user's default project output directory. For example, in Figure 1917, the data for this project is stored in:
/home/flow/FlowData/jsmith/Project_CHP Hotspot Project
...
Panel.
Conversion of UBAM to FASTQ files
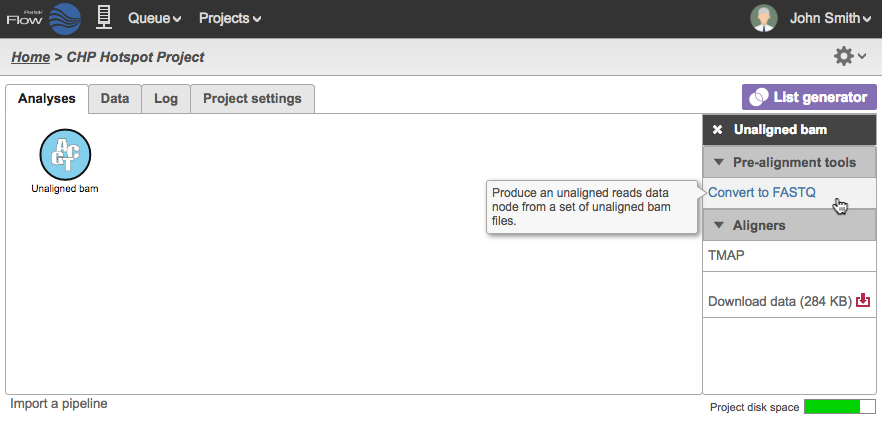
The plugin transfers the Unaligned BAM data from the Torrent Browser. The UBAM file format retains all the information of the Ion Torrent Sequencer. In the Partek Flow Project, the Analyses tab would show a circular data node named Unaligned bam. Click on the data node and the context-sensitive task menu will appear on the right (Figure 2318).
Unaligned BAM files are only compatible with the TMAP aligner, which can be selected in the Aligners section of the Task Menu. If you wish to use other aligners, you can convert the unaligned BAM files to FASTQ using the Convert to FASTQ task under Pre-alignment tools.
Some information specific to Ion Torrent Data (such as Flow Order) are not retained in the FASTQ format. However, those are only relevant to Ion Torrent developed tools (such as the Torrent Variant Caller) and are not relevant to any other analysis tools.
Figure 23:
| Numbered figure captions | ||
|---|---|---|
|
...
| |||
|
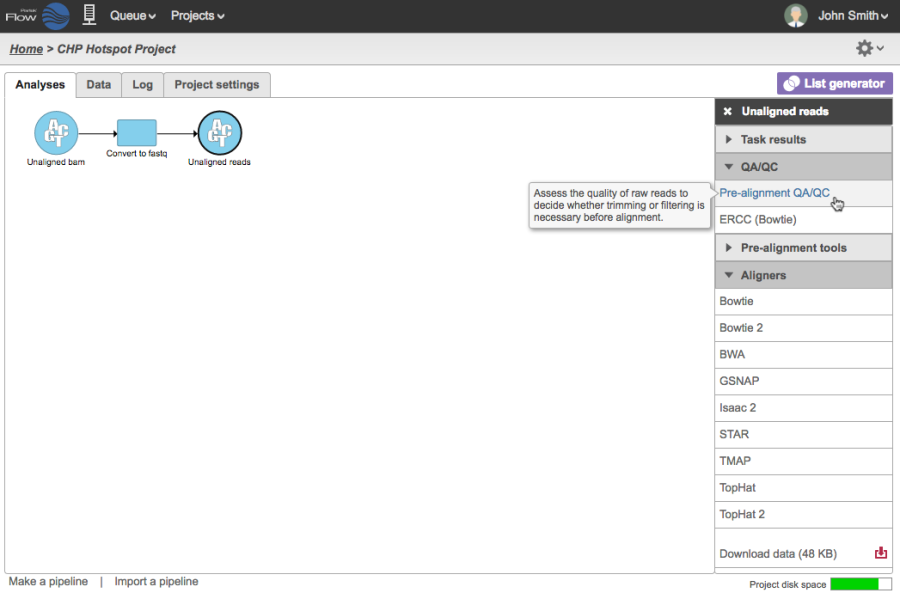
Once converted, the reads can then be aligned using a variety of aligners compatible with fastq FASTQ input (Figure 2419) . You can also perform other tasks such as Pre-alignment QAQC or run an existing pipeline.
Another option is to include the Convert to FASTQ task in your pipeline and you can invoke the pipeline directly from an Unaligned bam data node.
Figure 24:
| Numbered figure captions | ||
|---|---|---|
|
...
You do not have to delete files to delete a Project. Should you retain the files, they will remain in the Partek Flow server and can be deleted outside Partek Flow.
...
| Additional assistance |
|---|
|
...
| ||
|
| Additional assistance |
|---|
| Rate Macro | ||
|---|---|---|
|
...
Overview
Content Tools