Page History
| Table of Contents | ||||
|---|---|---|---|---|
|
For new projects, a sample table can be automatically created from a tab-delimited text file. There are several advantages of creating a sample table in this manner:
- You can define multiple samples and attributes even before data has been imported, allowing you to:
- customize the name of your samples, thus avoiding the automatic sample names generated based on file names
- import sample sheets as defined by the instrument that generated your data
- You can simultaneously create the sample table and import data, allowing you to:
- combine several files into one sample
- import data located in multiple subdirectories
This process of generating a sample table based on a text file can only be done once per project. Additional samples or attributes can still be added using the Import data or Manage attributes buttons under the Data Tab.
Select the Text File
The text file must be created outside of Partek® Flow® (you can use software such as Partek® Genomics Suite®, Microsoft® Excel® or any files are imported. In the Data Tab where text editor). A valid text file is a tab-delimited text file that contains one sample per row and columns containing sample information. At least one column must have unique entries and will be suggested as Sample IDs. Additional columns may contain numeric or categorical attributes and (optional) filenames. Examples of text files are shown in Figures 3 and 6.
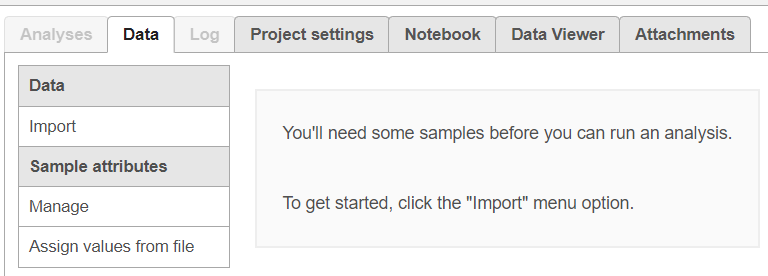
To select the text file, create a new project and in the blank Data Tab (no samples have been defined imported yet), click the Assign sample attributes values from a file button (Figure 1).
| Numbered figure captions | ||||
|---|---|---|---|---|
| ||||
|
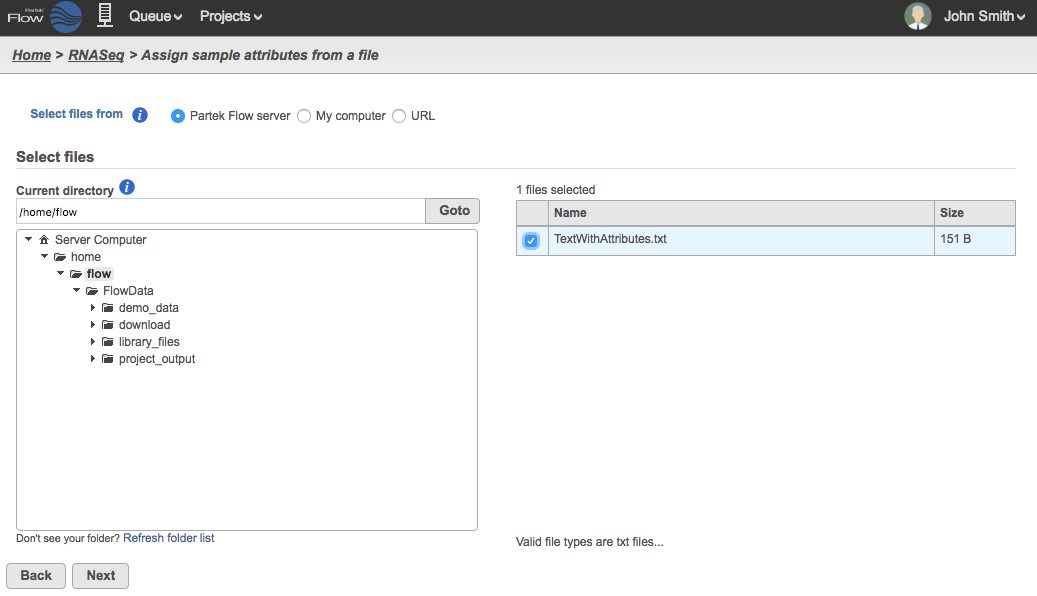
Navigate to the file using the browser as showin shown in Figure 2. The The text file may be located in the Partek® Flow® server, either the Partek Flow server, My computer, or from a a URL. However, some functionalities such as importing files based on the sample table (as described later in this section) are currently only available if the text file is in the Partek Flow Server. Click on the
Check the box next to the text file that you want to use and click click Next.
FIGURE
The behavior of the next step depends on the information contained in the selected text file.
Creating a Sample Table without Data Import
| Numbered figure captions | ||||
|---|---|---|---|---|
| ||||
|
Create the Sample Table
Text files that contain only sample information IDs and attributes such as the one shown in Figure 3 can be imported to create a sample table with no associated files. (If you wish to couple the table creation with data import, you must include the filenames as described in the section below on how to Include Data Import).
TABLE
A valid text file must contain at least one column that has unique entries. During import, Partek Flow will look for columns that contain unique entries and suggest those that could possibly be used as Sample Names. In the example below, the columsn for "Sample ID
| Numbered figure captions | ||||
|---|---|---|---|---|
| ||||
|

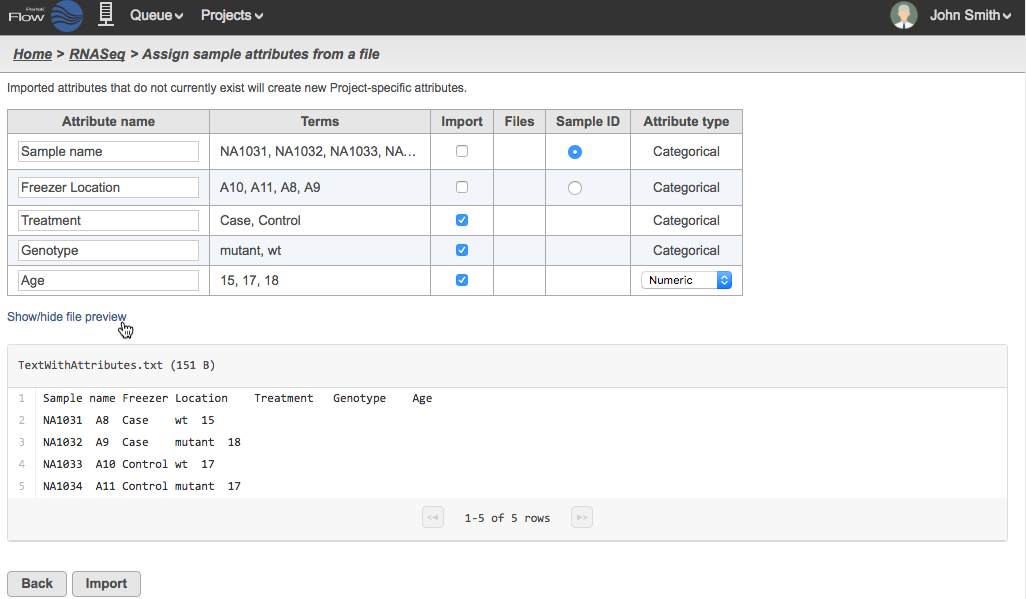
The text file will be summarized as in Figure 4. The first two columns show the headers and example terms parsed from the text file in Figure 3. The suggested attribute names can be renamed before import. Columns that contain unique entries are recognized as possible Sample IDs and can be selected using the radio button. You can choose which attributes to include and, if applicable, whether they are numeric or categorical. The Show/hide file preview link allows you to preview the text of the tab delimited text file you are using.
In the example in Figure 4, the columns for "Sample name" and "Freezer Location" are both unique and
...
FIGURE
You can also unselect the columsn you do not wish to import
Text can be imported as categorical attributes
...
Numeric can be imported as smaple attributes
...
You can rename the header.
Click import and the table will be created
FIGURE
Creating a Sample Table with Data Import
The text file must include the file names
The text file must be in the server.
-> useful if some files are within subdirectories
-> useful if ther are many files for one sample
No path
Relative path
Absolute path
| Additional assistance |
|---|
|
the former is selected as the
...
Sample ID. The "Freezer location" has been deselected and it will not be included in the resulting Sample table. Since "Age" has all number terms, the Attribute type column for it is a drop down menu to choose between Numeric and Categorical. There are no filenames in the text file so the Files column is empty.
| Numbered figure captions | ||||
|---|---|---|---|---|
| ||||
|
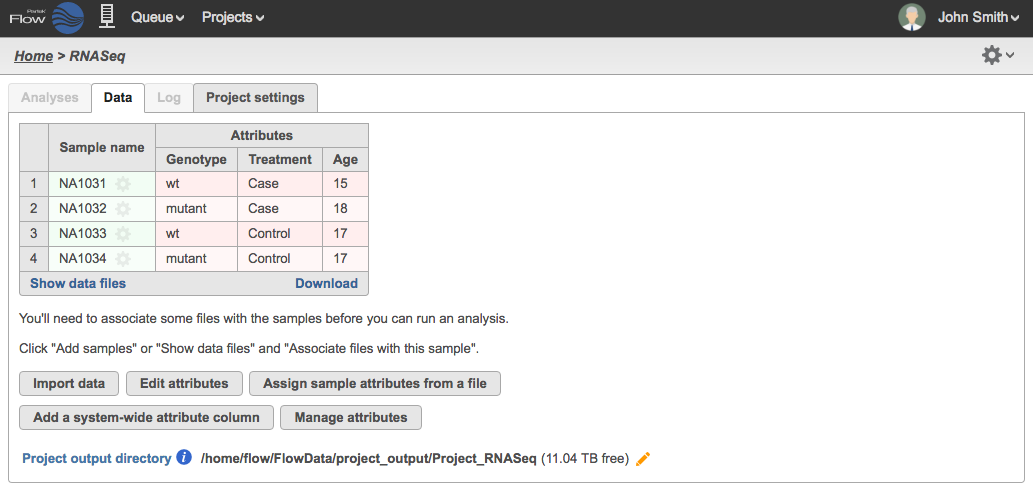
Click Import and the table will be created (Figure 5). Click Show data files to expand the table and associate files (see the Adding samples section).
| Numbered figure captions | ||||
|---|---|---|---|---|
| ||||
|
Include Data Import
If you have a text file that contains sample IDs and attributes as well as the filenames of your data, you can create the sample table and start the data import at the same time. This is particularly useful for projects where multiple files are associated with the same sample (e.g., a sample ran in multiple lanes in the sequencer).
For this type of import, the text file may be located in either the Partek Flow server, My computer, or from a URL. However, the data files should already be uploaded to the Partek Flow server (see section on file transfers).
In the text file, each filename to be associated with the sample must be separated by a tab. That means, if you are using a spreadsheet software to generate the text file, there is a maximum of one file per column. You also need to add headers such as file1, file2, etc., to define the columns. There is no limit on the number of columns on the text file. It is also possible to have a different number of files associated with different samples.
The filenames must show the proper extensions of data types compatible with Partek Flow (see Types of Data).
Text file and data are both in server and in same directory
If the text file and the data files are both in the same directory of the Partek Flow server, simply include the filenames in the text file as shown in Figure 6. You do not have to specify the file path.
| Numbered figure captions | ||||
|---|---|---|---|---|
| ||||
|

Text file and data are in different directories
If the text file and the data files are in different directories, you must modify Figure 6 to include the file paths. For text files located in the Partek Flow server, you can use relative or absolute file paths. For text files located in My Computer or URL you must use an absolute file path. (Remember that in either case, the data files must have already been uploaded in the Partek Flow server.)
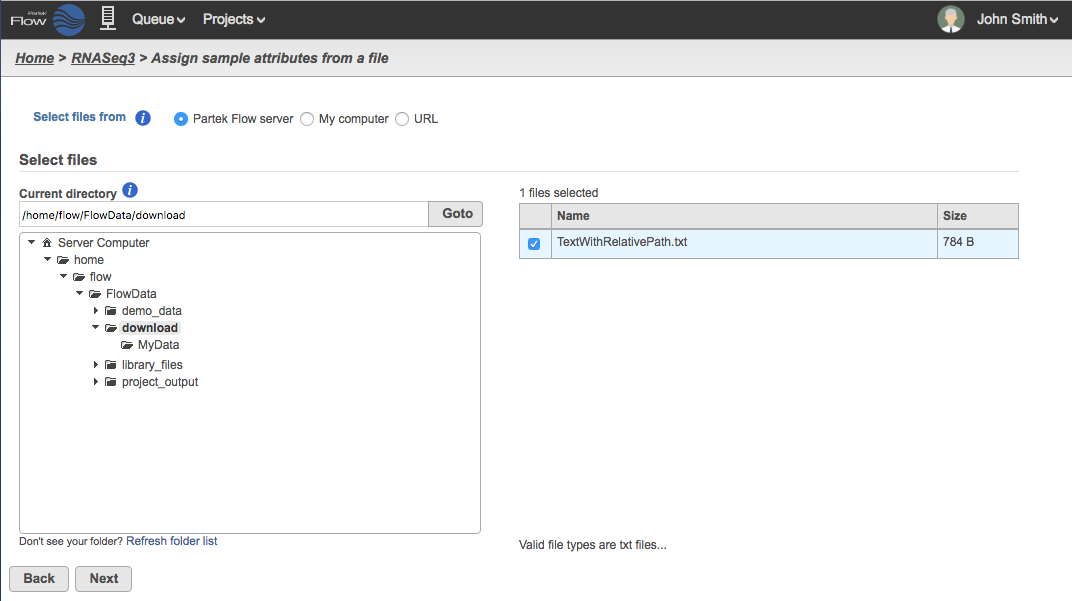
Relative path
You can use a path relative to the location of the text file you are using to create the sample table. For example in Figure 7, the text file is located in a directory called "download" while the files are in a subdirectory called MyData, then the filenames must include the path /MyData/. An example would be: /MyData/NA1031_S25_L007_R1_001.fastq.gz| Numbered figure captions | ||||
|---|---|---|---|---|
| ||||
|
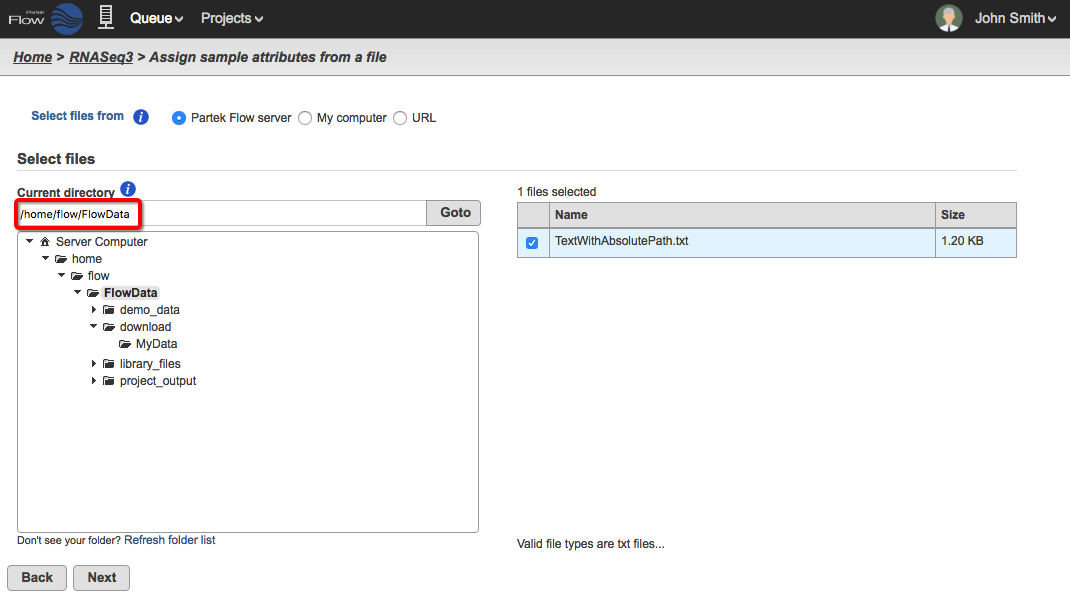
Absolute path
You can use the full path to the file based on your Partek Flow server. You must include the paths starting from the Partek Flow home directory (Figure 8, red box). For typical installations, the path begins with /home/flow/FlowData/ and so the filenames to include in the text file may look like this: /home/flow/FlowData/download/MyData/NA1031_S25_L007_R1_001.fastq.gz
| Numbered figure captions | ||||
|---|---|---|---|---|
| ||||
|
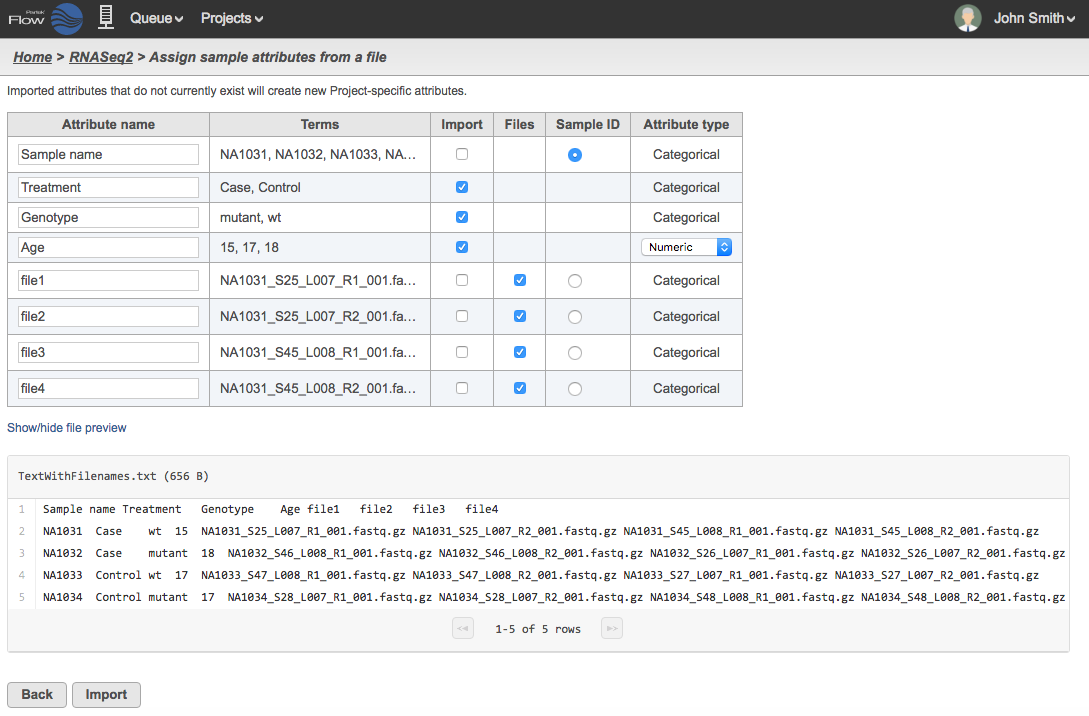
Once you have selected the text file with filenames and/or file paths, click Next. The text file will be summarized as in Figure 9. If the file types are valid, Partek Flow will recognize the filenames and locate the files within the directory. The Files column represent files to be imported.
| Numbered figure captions | ||||
|---|---|---|---|---|
| ||||
|
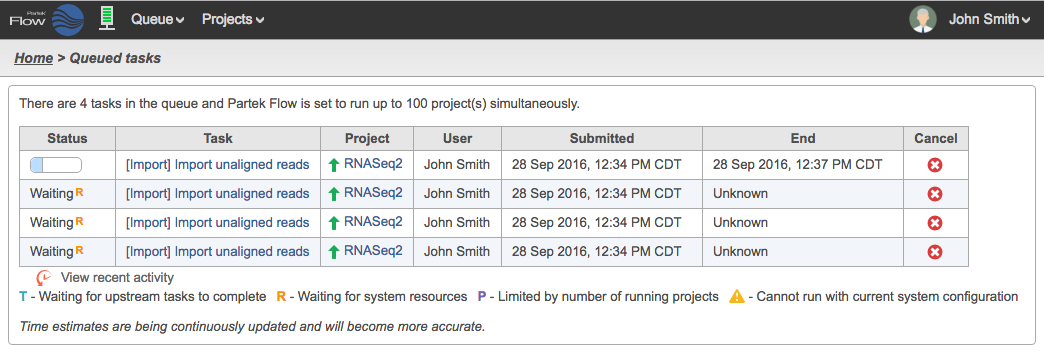
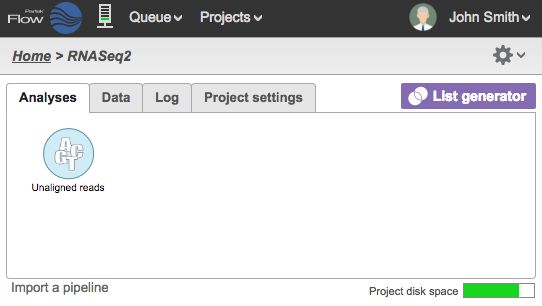
Click Import and the table will be created. After a few seconds, the server icon will be animated (Figure 10). This means that the process of importing data files have started. Click the Queue dropdown and select View queued tasks... to see the queue of import tasks (Figure 11).
| Numbered figure captions | ||||
|---|---|---|---|---|
| ||||
|

| Numbered figure captions | ||||
|---|---|---|---|---|
| ||||
|
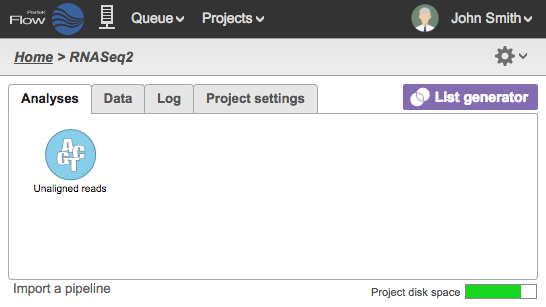
At this stage, you can also go to the Analyses Tab of the project and see that the data node has been created but the color is light blue, which indicates the import is not complete (Figure 12, left). Once all the files have been imported from the queue, the data node will appear darker (Figure 12, right).
| Numbered figure captions | ||||
|---|---|---|---|---|
| ||||
|
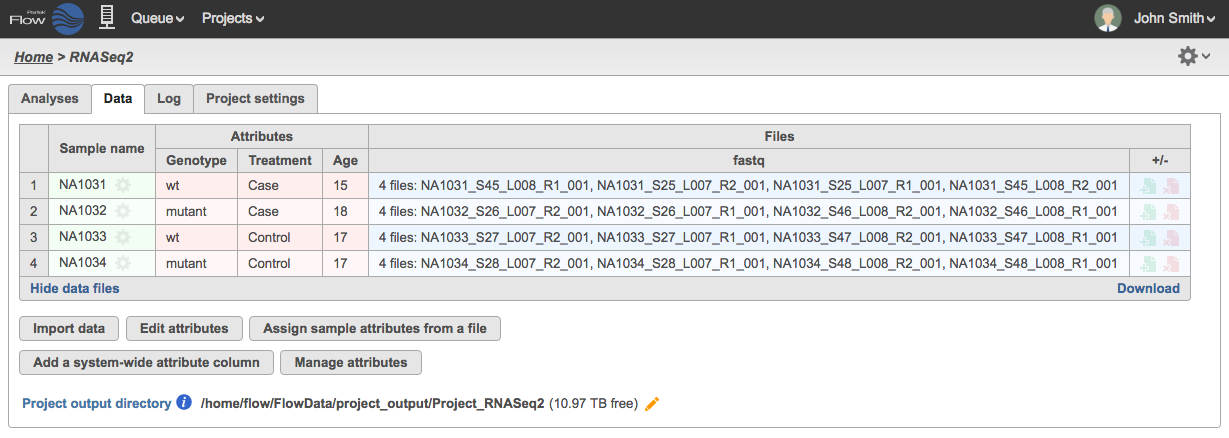
To view the files associated with the data, go to the Data Tab and click Show data files to expand the table. Figure 13 shows that four files were successfully imported for each sample. You can add or delete samples as described in the Adding samples section.
| Numbered figure captions | ||||
|---|---|---|---|---|
| ||||
|
| Additional assistance |
|---|
| Rate Macro | ||
|---|---|---|
|
Overview
Content Tools