Page History
| Table of Contents |
|---|
Project details
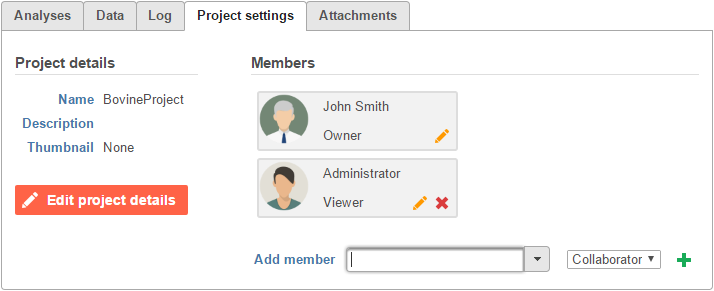
The Project details section shows the Name of the project as well as an (optional) a textual project Description and a Thumbnail (picture) (Figure 1).
| Numbered figure captions | ||||
|---|---|---|---|---|
| ||||
|
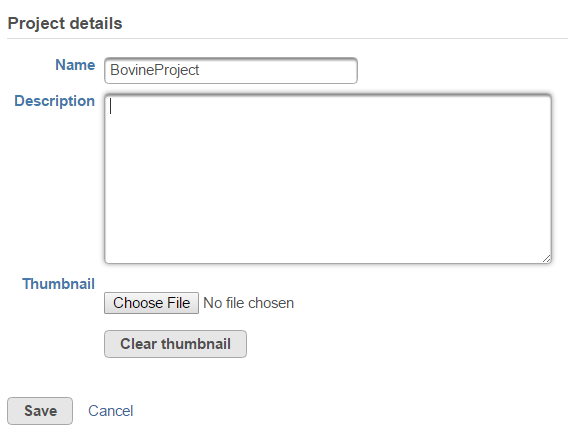
The owner and project collaborators will see an additional pencil icon and a link to Edit project detail that will give the options tocollaborators (if any) can customize the Description and Thumbnail entries by pushing the orange Edit project details button (Figure 2). The fields can now be edited to:
- Rename the project (names are limited to 30 characters). The original project Name is the one selected when creating the project
- Add or change a project description (up to 2000 characters)
...
- Add or change a thumbnail of the project (supported formats are .jpg, .bmp, .gif, .png; the maximum size of the image file is 10 MB)
The Description accepts hyperlinks starting with "http://" or "https://" and if selected, will open a new tab browser to navigate to the website. This description will be also displayed to collaborators and administrators on the Partek® Flow Flow® Home Page.
Collaboration
The Collaboration section Chose File button launches a file browser showing directory structure of the local computer from which the thumbnail image file will be uploaded. Alternatively, Clear thumbnail button removes the current thumbnail.
Once all the edits have been made, push Save to accept (or Cancel to reject).
| Numbered figure captions | ||||
|---|---|---|---|---|
| ||||
|
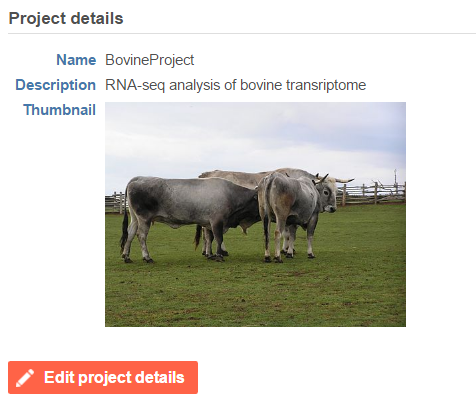
If a thumbnail has been added, it will appear on the Project details tab (Figure 3) and on the home page of Partek Flow, on the Details tab of the project.
| Numbered figure captions | ||||
|---|---|---|---|---|
| ||||
|
Members
The Members section provides an overview of users associated with a particular project and enables project creators (owners) and administrators to add collaborators (Figure 1). A user (without administrator status) has to be specified as a collaborator in a project to be able to access the project in his/her home folder and to perform tasks.
To add a collaborator, type a username in use the Add member box and click the button. Previous collaborators may be selected using the dropdown box drop-down menu. The drop-down menu will list users you are collaborating with on any project on the current instance of Partek Flow. Click a user name in the drop-down list and then click the
![]() button to add them as a collaborator. To add a user you have not collaborated with before, type their exact username (e.g., jsmith) and click the
button to add them as a collaborator. To add a user you have not collaborated with before, type their exact username (e.g., jsmith) and click the ![]() button to add them. Depending on the collaborator's preference settings, an email notification may be sent to the email address associated with their user account. To delete a collaborator, select the
button to add them. Depending on the collaborator's preference settings, an email notification may be sent to the email address associated with their user account. To delete a collaborator, select the![]() next to their username . (you will be asked for confirmation).
next to their username . (you will be asked for confirmation).
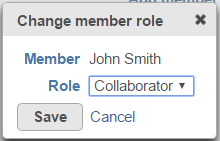
Pushing the pencil icon (![]() ) by a project member can result in two dialogs, depending on the status of the member. For a collaborator or a viewer, the pencil icon changes the member's role (e.g. from a Viewer to a Collaborator) (Figure 4).
) by a project member can result in two dialogs, depending on the status of the member. For a collaborator or a viewer, the pencil icon changes the member's role (e.g. from a Viewer to a Collaborator) (Figure 4).
| Numbered figure captions | ||||
|---|---|---|---|---|
| ||||
|

| Additional assistance |
|---|
|
| |||
|
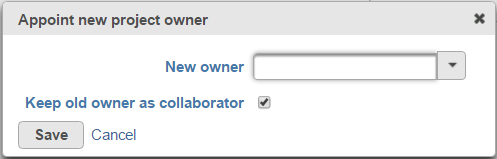
Moreover, the project owner can transfer the ownership to another user account (one of the accounts already available at the current instance of Partek Flow) using the New owner dropdown list (Figure 5). The previous (old) owner can remain as a project collaborator, with the help of the matching option.
| Numbered figure captions | ||||
|---|---|---|---|---|
| ||||
|
If email notifications are turned on for project ownership transfer, an email dialog box appears. This can be used to add additional text to the notification email body (Figure 6).
| Numbered figure captions | ||||
|---|---|---|---|---|
| ||||
|
| Page Turner | ||||||
|---|---|---|---|---|---|---|
|
| Rate Macro | ||
|---|---|---|
|
Overview
Content Tools